Create a MAC-Specific Provisioning Role Template and Provisioning Role
User's Guide feedback on: Cisco Server Provisioner 6.6 User's Guide ("Chuck Berry") - Create a MAC-Specific Provisioning Role Template and Provisioning RoleProvision_w2k8_MAC-SpecTutorial: Provision Windows Server 2012 & 2008 and Windows 8 & 7 > Create a MAC-Specific Provisioning Template and Role /Dear User's Guide Staff,
Create a MAC-Specific Provisioning Role Template and Provisioning Role
First, you must create a MAC-Specific Provisioning Role Template (specifying what OS/distro to install, and optionally, what applications to install and scripts to execute) then create a MAC-Specific Provisioning Role for a specific system with its unique MAC address, and assign the Provisioning Template to the Provisioning Role (unique per server, blade or VM).
Please read this entire Topic to fully understand the concepts and mechanisms.
If you create multiple Templates, you can easily change what version of Windows (or other operating systems) to install on the system (and optionally what applications to install and what scripts to execute) by simply assigning a different Template to the Provisioning Role.
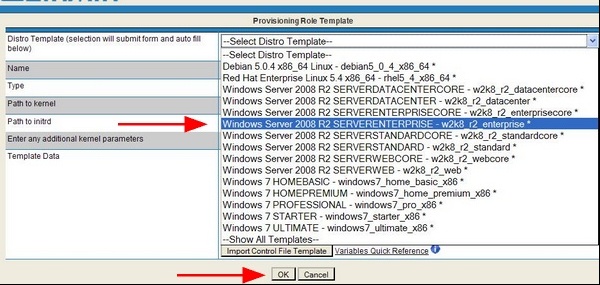
Select what you want to provision with this Template:
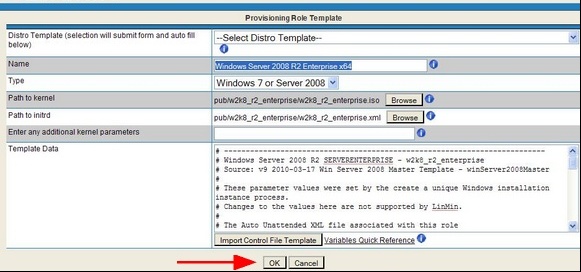
After you have made your selection, the form’s fields will be automatically populated:
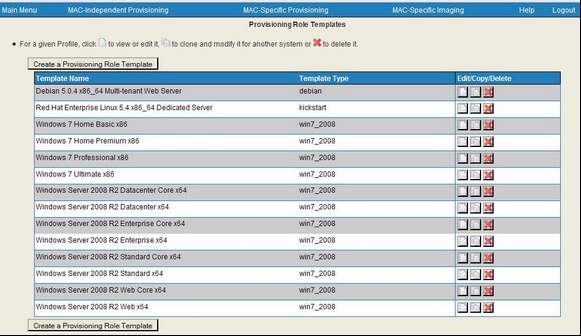
You will then be brought back to the Templates page:
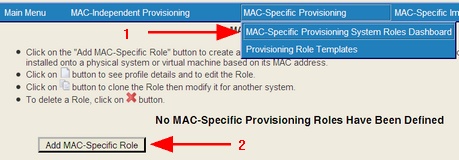
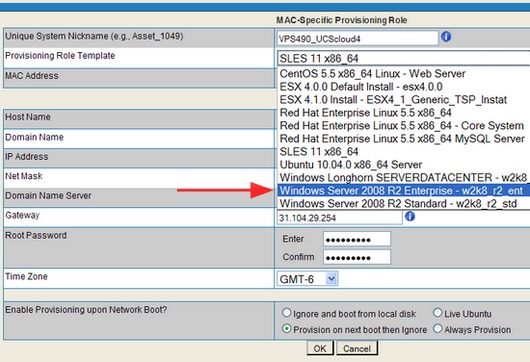
Create the Provisioning Role (or edit an existing one)
Select the Template for your Role and select "Provision on Next Boot".
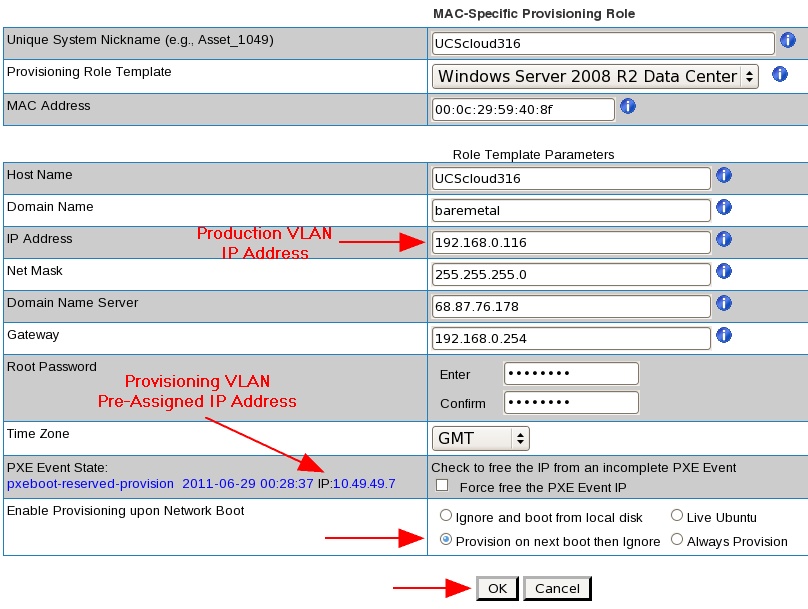
With Windows Server 2008, you can select the IP address to be static or DHCP after the system has been rebooted on the non-PXE VLAN.
Static IP:
Complete the form and select the "Next Boot" option:
MAC addresses must be entered in colon-delimited format, e.g., 00:50:56:49:49:49.
Client IP Address and PXE Event States
Starting with the Chuck Berry Supplemental Package that supports the provisioning of Windows Server 2012 and Windows 8, systems provisioned with Windows Server 2012 & 2008 and Windows 8 & 7 will have their IP addresses set as follows:
•MAC-Specific Provisioning with Static IP: upon rebooting on the PXE VLAN, the IP address will be set to static as defined in the MAC-Specific Provisioning Role and cannot be reached via IP while on the PXE VLAN. Upon relocating the Windows client system to the correct production (non-PXE) VLAN, it will be reachable via IP address. The final PXE Event State is "pxeevent-provision-rebooted".
Prior to the Chuck Berry Supplemental Package:
•MAC-Specific Provisioning with Static IP: upon rebooting on the PXE VLAN, the IP address will be set to DHCP. as defined in the MAC-Specific Provisioning Role and cannot be reached via IP while on the PXE VLAN. Upon relocating the Windows client system to the correct production (non-PXE) VLAN and rebooting, the static IP defined in the MAC-Specific Provisioning Role will be set. The final PXE Event State is "pxeevent-provision-rebooted".
Caution: if you accidentally move your system to a VLAN other than the VLAN of the static IP address specified in the GUI or provided via the API (the "Production VLAN"), your system will become unreachable by IP address.
Note: prior to the Chuck Berry Supplemental Package, when deploying Windows Server 2008 "Core" configurations, the boot script to change the IP to static will not be automatically executed when the Client system is relocated to a production (v)LAN and the Client is rebooted. The "rebooted" state does get updated and nmap can be used to determine if the box is running if here is no response to ping. You can manually launch the script to change the IP address of a "Core" Windows Server system to the GUI-selected static IP on the Production (v)LAN once the system is rebooted on the Production (v)LAN: C:\post\install\bmpSetIp.bat
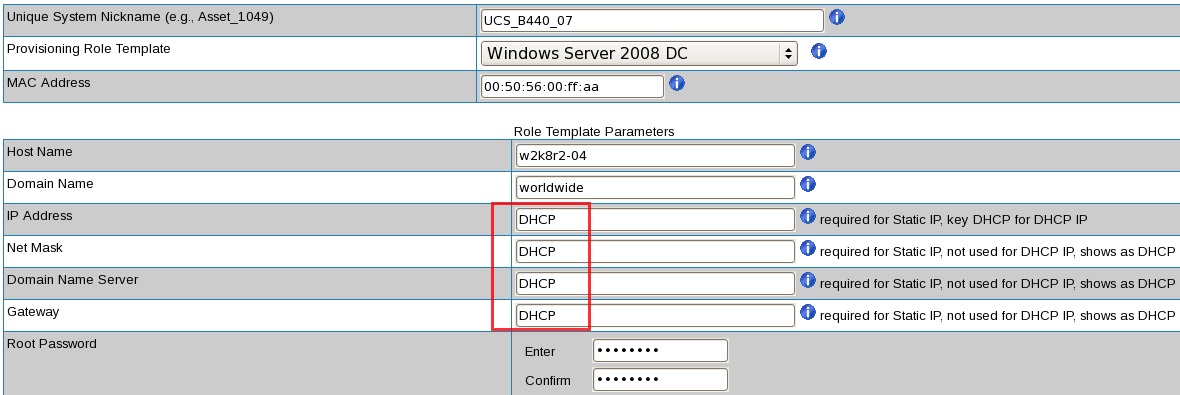
DHCP IP:instead of entering static IP-related information, enter only "DHCP" as noted below.
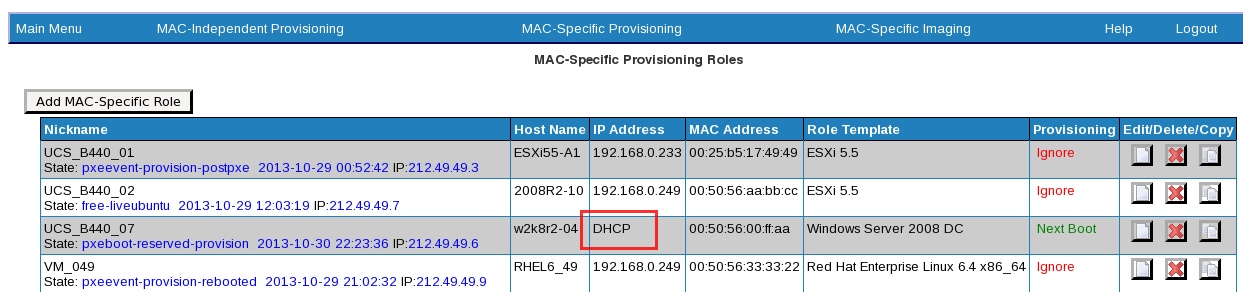
The dashboard will display "DHCP" instead of a static IP address:
When provisioning with DHCP IP, the final 2 PXE Event States will be pxeevent-macindy-rebooting and pxeevent-macindy-rebooted.
And you will be brought to the Roles Dashboard, showing the "PXE Event State" and Provisioning PXE VLAN IP, as well as the eventual production VLAN IP address.
Note: Windows host names cannot exceed 15 characters.
Client IP Address and PXE Event States
•MAC-Specific Provisioning with Dynamic (DHCP) IP: upon rebooting on the PXE VLAN, the IP address will be DHCP serviced by the Provisioner PXE Server. Upon relocating the Windows client system to the correct production (non-PXE) VLAN serviced with DHCP, it will be assigned a new DHCP IP address. The final PXE Event State is "pxeevent-provision-rebooted".
Note: when provisioning a multi-NIC Client, the IP address will be properly assigned to the correct MAC address as specified in the GUI or via the API, however Windows will not necessarily assign the IP address to the corresponding Local Area Connection (null, 2, 3 or 4). For example, you may select the MAC address of NIC1 but Local Area Connection 3 may be used.
The time zone for MAC-Specific Provisioning is established when the Windows Install Instance is created, and is stored in the /home/tftpboot/pub/w_your_instance_name/w_your_instance_name.xml. Upon create a MAC-Specific Provisioning Role, a new file gets created: /home/tftpboot/pub/w_your_instance_name/mac_address.xml, which is based on the contents of w_your_instance_name.xml. If you use the GUI to change the time zone for a MAC-Specific Provisioning Role, you will be limited to the 24 GMT time zones. If you require another time zone, e.g., India Standard Time, you may edit the w_your_instance_name.xml, after which new Provisioning Roles and re-commited ("Next boot") Provisioning Roles will contain the desired time zone. Below is the list of 24 GMT time zones supported by the GUI:
$timezoneArray['Etc/GMT'] = 'Dateline Standard Time'; $timezoneArray['Etc/GMT-1'] = 'Azores Standard Time'; $timezoneArray['Etc/GMT-2'] = 'Mid-Atlantic Standard Time'; $timezoneArray['Etc/GMT-3'] = 'Greenland Standard Time'; $timezoneArray['Etc/GMT-4'] = 'Atlantic Standard Time'; $timezoneArray['Etc/GMT-5'] = 'Eastern Standard Time" selected="selected'; $timezoneArray['Etc/GMT-6'] = 'Central Standard Time'; $timezoneArray['Etc/GMT-7'] = 'US Mountain Standard Time'; $timezoneArray['Etc/GMT-8'] = 'Pacific Standard Time'; $timezoneArray['Etc/GMT-9'] = 'Alaskan Standard Time'; $timezoneArray['Etc/GMT-10'] = 'Hawaiian Standard Time'; $timezoneArray['Etc/GMT-11'] = 'Samoa Standard Time'; $timezoneArray['Etc/GMT+1'] = 'Central Europe Standard Time'; $timezoneArray['Etc/GMT+2'] = 'E. Europe Standard Time'; $timezoneArray['Etc/GMT+3'] = 'Russian Standard Time'; $timezoneArray['Etc/GMT+4'] = 'Arabian Standard Time'; $timezoneArray['Etc/GMT+5'] = 'West Asia Standard Time'; $timezoneArray['Etc/GMT+6'] = 'Central Asia Standard Time'; $timezoneArray['Etc/GMT+7'] = 'SE Asia Standard Time'; $timezoneArray['Etc/GMT+8'] = 'China Standard Time'; $timezoneArray['Etc/GMT+9'] = 'Tokyo Standard Time'; $timezoneArray['Etc/GMT+10'] = 'West Pacific Standard Time'; $timezoneArray['Etc/GMT+11'] = 'Central Pacific Standard Time'; $timezoneArray['Etc/GMT+12'] = 'New Zealand Standard Time';
Finally, boot the Client System to the network, and it will be provisioned with the operating system you selected. It will then reboot and be fully operational.