If you are upgrading from a prior version of Provisioner, please follow the instructions in "Upgrade to a New Version".
It is very important that you configure your environment as specified by Cisco as specified in this Quick Start Guide otherwise your installation will fail or be unstable. If you follow the guidelines below, you will become productive immediately.
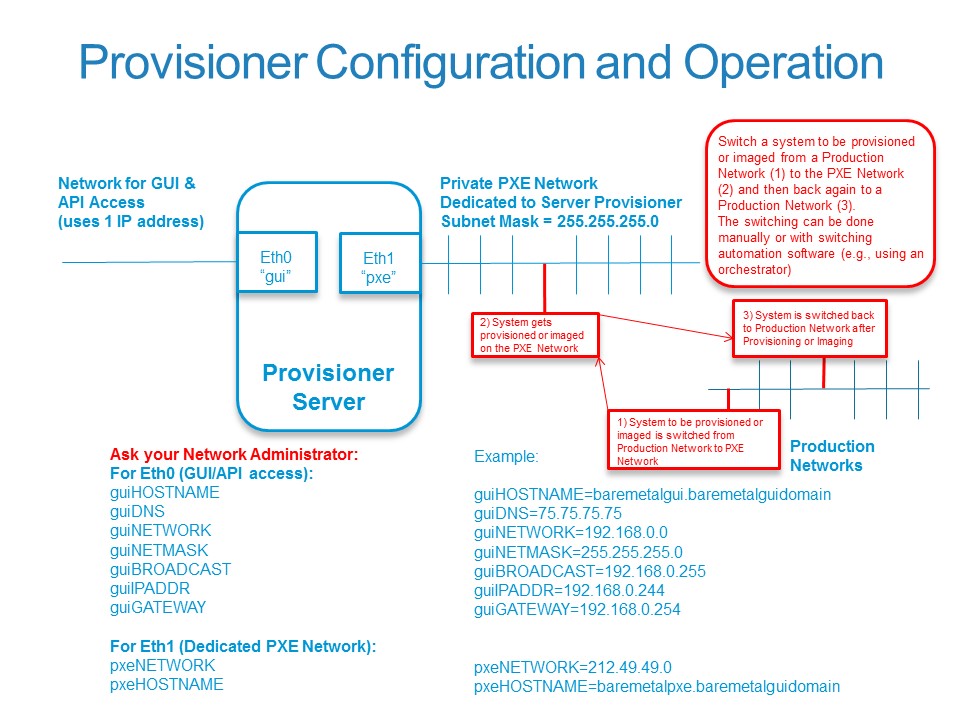
Provisioner is delivered as a software appliance whereby the physical system or virtual machine on which Provisioner is installed is dedicated to Provisioner and on which no other applications or services run. The Provisioner PXE Server can be accessed remotely via Firefox browser, via API and via SSH should external services need to interact with Provisioner.
Video Tutorial: Cisco Server Provisioner 6.5 Installation (4:21) (this video applies to Provisioner)
Before you install Provisioner, there are 3 sets of steps required to prepare your system.
Step 1: Contact your Network Administrator and obtain the values required to properly install Linux, prepare your system and finally install Provisioner.
The values you require are (remember, "gui" refers to Eth0 and "pxe" to Eth1):
guiHOSTNAME=
guiDNS=
guiIPADDR=
guiGATEWAY=
guiNETMASK=
pxeNETWORK=
For example, here are the values that are valid in one of our labs:
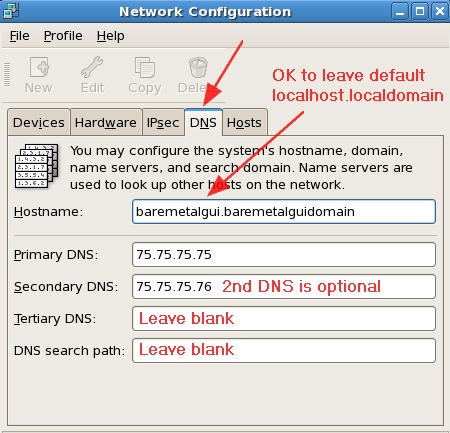
guiHOSTNAME=baremetalgui.baremetalguidomain
guiDNS=75.75.75.75
guiIPADDR=192.168.0.244
guiGATEWAY=192.168.0.254
guiNETMASK=255.255.255.0
pxeNETWORK=212.49.49.0
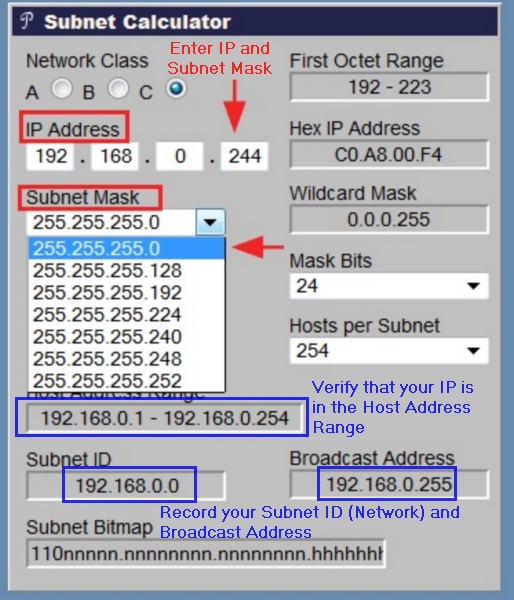
Please verify the network values you have been provided using a subnet calculator, such as http://www.subnet-calculator.com/
Enter the IP address ("guiIPADDR") and Subnet Mask ("guiNETMASK") you have been provided by your Network Administrator. If you were given a Subnet Mask that does not match one provided in the drop-down list after you entered your IP address, you have been given incorrect values.
Verify that your IP Address ("guiIPADDR") is in the Host Address Range.
Record your Subnet ID (Network) and Broadcast IP Address.
Step 2: Prepare your system, operating system, selected settings and check your networking
Hardware Requirements:
•Intel Architecture-based 64-bit system (x86_64/AMD64, not Itanium) on a Virtual Machine or physical system with a minimum of 2GHz processor, 2-4 GB RAM recommended, 1 GB RAM minimum), 100GB+ fast disk. Refer to Provisioner PXE Server Configuration - Hardware Requirements for more details.
Software Requirements:
•If running on a VMware Virtual Machine, your hypervisor must be ESXi, not ESX or Workstation. With Provisioner running on an ESX-hosted VM, provisioning ESXi may corrupt your ESX host. •Red Hat Enterprise Linux (properly registered with # rhn_register) or CentOS 5.11 64-bit only ("x86_64") with no virtualized kernel (e.g. xen or kvm). •Installing Provisioner on RHEL/CentOS 32-bit ("i386") is not supported. •Installing Provisioner on RHEL/CentOS 6.x or RHEL/CentOS 7.x is not supported at this time.
Instructions:
•If you are not a Red Hat subscriber, download CentOS 5.11, and install the 64-bit OS on a 64-bit system (hardware or VM) •We find that installing a simple Gnome desktop makes it easy to use the local browser on the Provisioner PXE Server, while providing a Windows-like environment. •When installing RHEL or CentOS, accept all defaults including the language US/English (en_US.UTF-8 and do not modify your language later): this entire OS installation should be a Click "Next" - Click "Next" process. Do not add or remove packages/applications afterwards, do not change paths or make any other modifications to your installation unless indicated in this User's Guide. All necessary system software components (PostgreSQL, dhcp, NFS, Samba, PHP, Perl, etc.) will be downloaded and configured automatically during the Provisioner PXE Server preparation or product installation. Do not establish symbolic links with base Provisioner directories. •Configure your system clock with ntpd to your time zone (if you don't, you may need to reinstall the OS and Provisioner due to Linux conflicts with date/time) •During the installation, you must have Internet access. In addition to accessing the yum repository, other third party packages will be automatically downloaded from remote repositories. Even if you have a local RHEL RHN Satellite, you will need Internet access for these third party packages. You do not need Internet access after the installation. •Perform a yum -y update. If using RHEL, ensure that you use a RHN Channel that updates your RHEL 5.x and does not upgrade your system to RHEL 6.x. Reboot is recommended, and is mandatory if kernel packages were updated. •If you are using VMware ESXi, suspend your VM and take a snapshot (e.g., "Before Provisioner preparation").
Step 3: Prepare your network configuration files then run the preparation script to validate your networking and download supporting files
Network configuration can be complex and varies from network to network. The preparation script is used to assist you with the configuration of Provisioner-related networking files after which it downloads, installs and configures additional packages required for proper preparation.
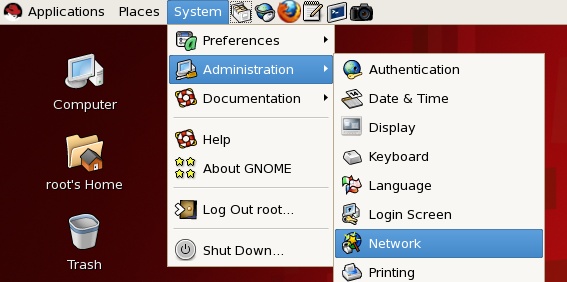
Before you run the preparation script, configure NICs using the RHEL or CentOS Graphical Network Editor:
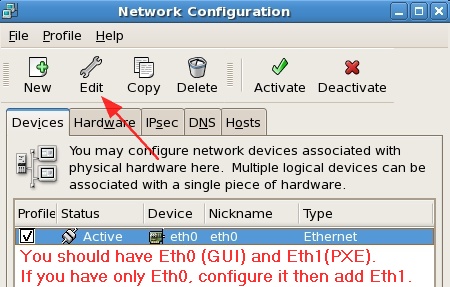
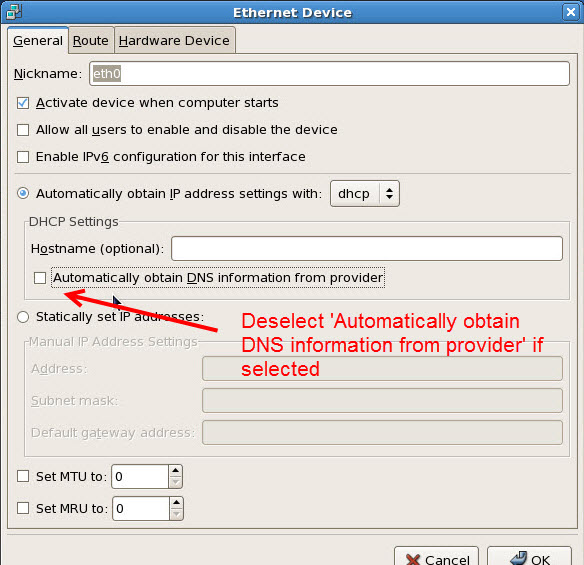
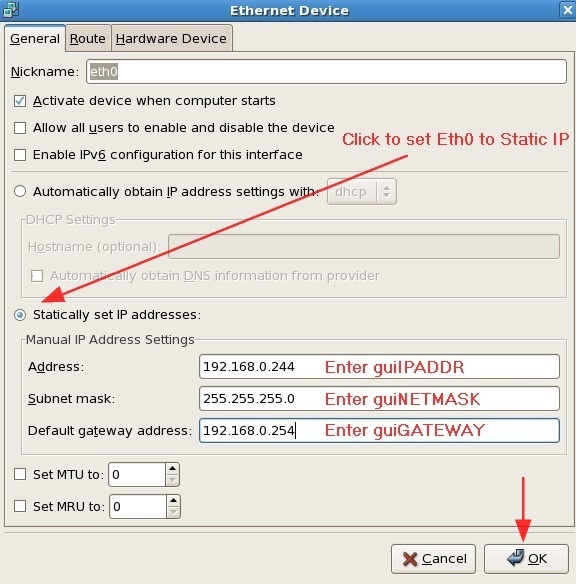
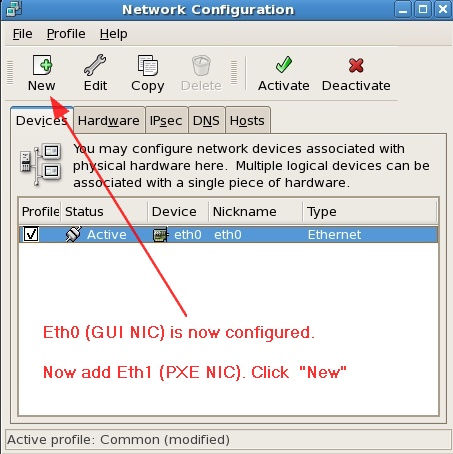
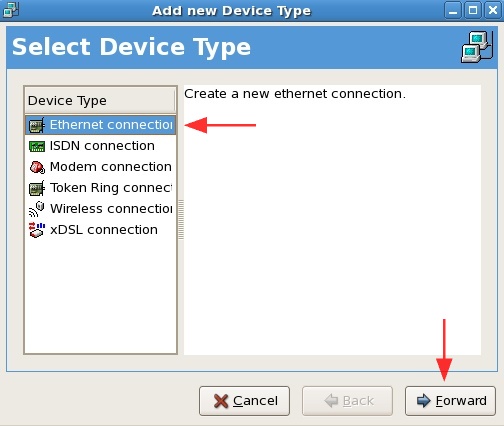
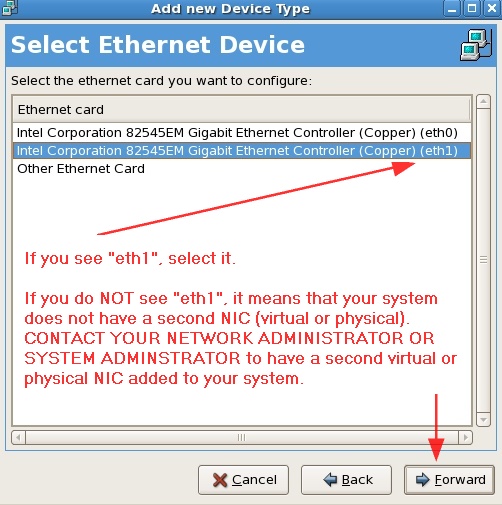
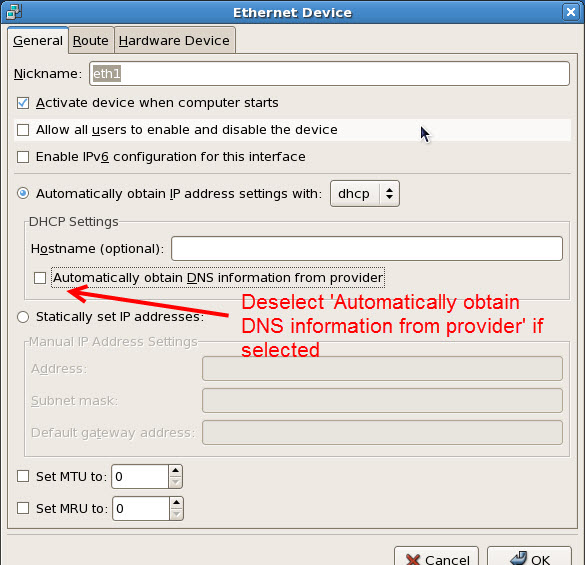
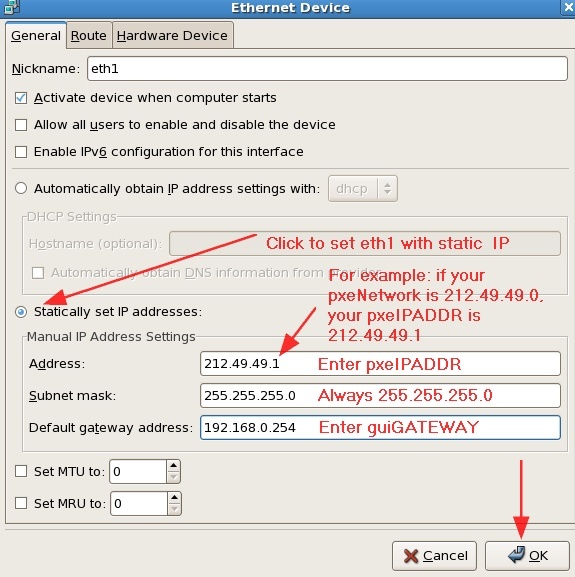
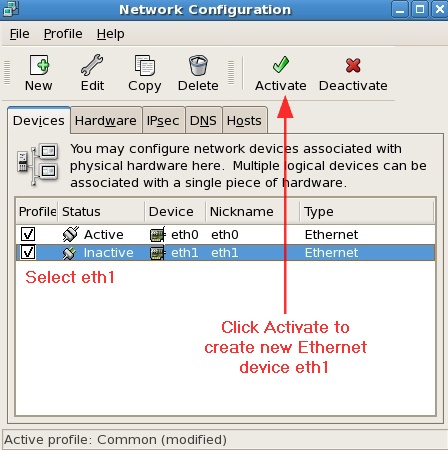
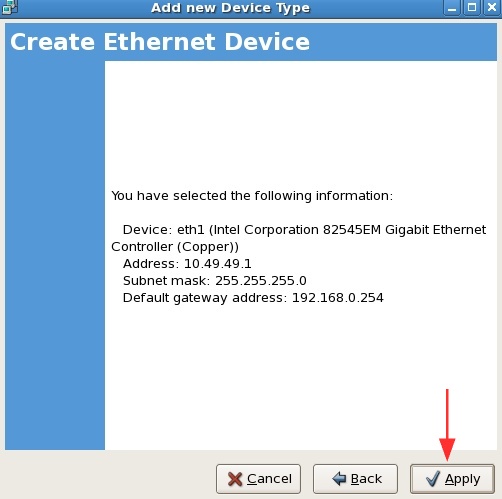
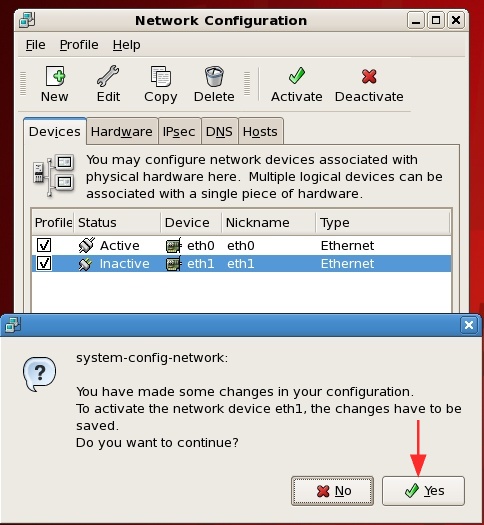
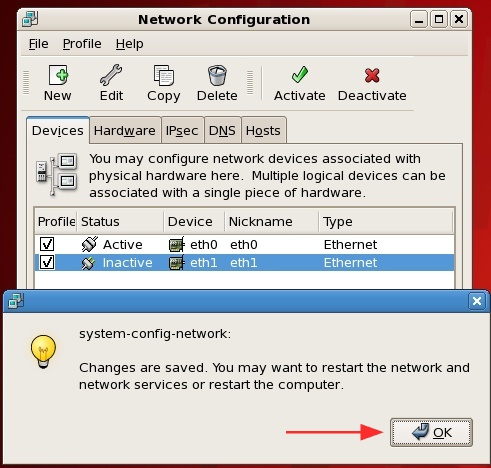
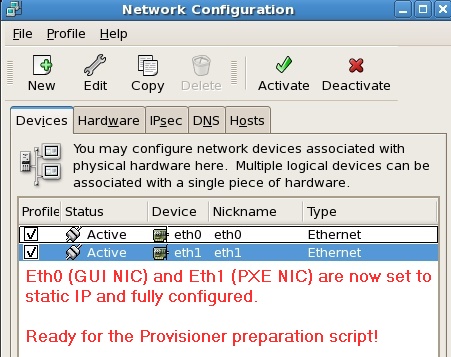
After using the Graphical Network Editor:
/etc/sysconfig/network-scripts/ifcfg-eth0 should contain these lines (your values may vary):
DEVICE=eth0
BOOTPROTO=none
ONBOOT=yes
HWADDR=00:0C:29:9D:2E:17
IPADDR=192.168.0.244
NETMASK=255.255.255.0
GATEWAY=192.168.0.254
NETWORK=192.168.0.0
BROADCAST=192.168.0.255
/etc/sysconfig/network-scripts/ifcfg-eth1 should contain these lines (your values may vary):
TYPE=ethernet
DEVICE=eth1
BOOTPROTO=none
ONBOOT=yes
HWADDR=00:50:56:00:00:BB
IPADDR=212.49.49.1
NETMASK=255.255.255.0
GATEWAY=192.168.0.254
NETWORK=212.49.49.0
Next, check your networking for proper connectivity:
[root@baremetalgui linmin]# service network restart
Shutting down interface eth0: [ OK ]
Shutting down interface eth1: [ OK ]
Shutting down loopback interface: [ OK ]
Bringing up loopback interface: [ OK ]
Bringing up interface eth0: [ OK ]
Bringing up interface eth1: [ OK ]
[root@baremetalgui linmin]#
[root@baremetalgui linmin]# ping www.google.com (depending on your network configuration, you may not be allowed to ping google)
PING www.google.com (74.125.239.80) 56(84) bytes of data.
64 bytes from 74.125.239.80: icmp_seq=1 ttl=55 time=17.6 ms
64 bytes from 74.125.239.80: icmp_seq=2 ttl=55 time=16.6 ms
64 bytes from 74.125.239.80: icmp_seq=3 ttl=55 time=16.6 ms
[1]+ Stopped ping www.google.com
[root@baremetalgui linmin]#
[root@baremetalgui linmin]#
[root@baremetalgui linmin]# route
Kernel IP routing table
Destination Gateway Genmask Flags Metric Ref Use Iface
212.49.49.0 * 255.255.255.0 U 0 0 0 eth1
192.168.0.0 * 255.255.255.0 U 0 0 0 eth0
169.254.0.0 * 255.255.0.0 U 0 0 0 eth1
default firewall.hq.lin 0.0.0.0 UG 0 0 0 eth0
[root@baremetalgui linmin]#
[root@baremetalgui linmin]# yum -y update (note: on RHEL, yum access requires a subscription; contact your system admin for assistance)
Loaded plugins: product-id, rhnplugin, security, subscription-manager
This system is not registered to Red Hat Subscription Management. You can use subscription-manager to register.
This system is receiving updates from RHN Classic or RHN Satellite.
Skipping security plugin, no data
Setting up Update Process
No Packages marked for Update
[root@baremetalgui linmin]#
You have verified network connectivity and may now execute the preparation script.
The Provisioner PXE Server requires full root access privileges. You must either login as root, or subsequently execute the command:
# su - root
Note the dash (-) before "root". If you do not use the dash, you will not have full root access privileges (instead, you will have the lesser root access privileges as if you entered "sudo root".)
Create a directory then copy the preparation script and installation files you downloaded to this directory:
# mkdir /usr/local/linmin
Download the correct version of Clonezilla and save it in /usr/local/linmin. Copy this URL and paste it into your browser:
https://sourceforge.net/projects/clonezilla/files/clonezilla_live_alternative/OldFiles/20120620-precise/clonezilla-live-20120620-precise.zip/download
Your directory should contain the following files:
[root@baremetalgui ~]# cd /usr/local/linmin
[root@baremetalgui linmin]# ll
total 638056
-rwxrw-rw- 1 root root 130616123 Feb 25 14:25 clonezilla-live-20120620-precise.zip
-rwxrw-rw- 1 root root 31650 Feb 25 09:32 LinMin_ChuckBerry_Trial_Mcc_c30_mEPMWPM_E_R66CBerry_G16Feb25_lbmp.exp (example only)
-rwxrw-rw- 1 root root 506980 Nov 11 2013 linmin-prep-provisioner-6-5-1-b1306291844-p1310301208.exp
-rwxrw-rw- 1 root root 235109685 Jul 12 2013 linmin-provisioner-6-5-1-b1306291844-p1307121436-install.exp
-rwxrw-rw- 1 root root 286413221 Sep 10 2014 linmin-provisioner-plus-ChuckBerry-p20140910105510-b1306291844.exp
Note: the file LinMin_ChuckBerry_Trial_Mcc_c30_mEPMWPM_E_R66CBerry_G16Feb25_lbmp.exp is a license key file that was generated by LinMin upon request when you submitted license key request and eth1 MAC address at http://www.linmin.com/site/contact.html
Note: you can install Provisioner first and then request and install the license key.
# sh cisco-prep-provisioner-{build#}-{build-date}-{package-date}.exp
For example:
#sh linmin-prep-provisioner-6-5-1-b1306291844-p1310301208.exp
Follow the directions as presented by the script. Read the introduction messages carefully.
#...............................................................................
#~# v2 2013-04-30 BMP Networking configuration variables and values in installNetworkingConfiguration.cfg
# See the annotated template file at: /usr/local/linmin/templates/installNetworkingConfiguration.cfg
# or use install menu option 'g' to review the annotated template file
# Edit and change values in the file at: /usr/local/linmin/installNetworkingConfiguration.cfg
# or use install menu option 'r' to revise the values in this file
#
guiHOSTNAME=baremetalgui.baremetalguidomain
guiDNS=192.168.0.254
guiIPADDR=192.168.0.244
guiGATEWAY=192.168.0.254
guiNETMASK=255.255.255.0
pxeNETWORK=212.49.49.0
#
#^^^^^^^^^^^^^^^^^^^^^^^^^^^^^^^^^^^^^^^^^^^^^^^^^^^^^^^^^^^^^^^^^^^^^^^^^^^^^^^
Start of Preparation Process ^^^^^ Scroll up to view relevant messages ^^^^^
* Consult the online Users Guide Quick Start section.
* For networking values please contact your Network Administrator for assistance.
* After resolution of issues re-execute this script or the provisioner preparation .exp package.
* If you are unable to successfully complete the execution of this server preparation script,
for reasons other than network values, create a support help file and email it to support.
...install values to be used to set static networking: (^^^^^ complete .cfg file text above ^^^^^)
guiHOSTNAME=baremetalgui.baremetalguidomain
guiDNS=192.168.0.254
guiIPADDR=192.168.0.244
guiGATEWAY=192.168.0.254
guiNETMASK=255.255.255.0
pxeNETWORK=212.49.49.0
Options:
* "g" see an annotated guide of the required install configuration networking values.
* "r" review and accept or revise the install configuration networking values shown above.
* "s" see the networking values in play at this time.
* "h" create a support help file.
* "e" exit this script.
^^^^^ Scroll up to view relevant messages ^^^^^
#^^^^^^^^^^^^^^^^^^^^^^^^^^^^^^^^^^^^^^^^^^^^^^^^^^^^^^^^^^^^^^^^^^^^^^^^^^^^^^^
^^^^^ Options for Networking information, or create a support help file
Respond: ^^^^^ select option from menu above, allowed->:g:r:s:h:e: [r]: r
#...............................................................................
...install values to be used to set static networking:
guiHOSTNAME=baremetalgui.baremetalguidomain
guiDNS=192.168.0.254
guiIPADDR=192.168.0.244
guiGATEWAY=192.168.0.254
guiNETMASK=255.255.255.0
pxeNETWORK=212.49.49.0
Actions:
* 'e' exit this script
* 'r' return to menu
* 'valuesAreCorrect' to confirm that all install values above are correct
* 'name' of value to change
^^^^^ 'valuesAreCorrect', value name to change value, 'e' to exit, or 'r' to return
Respond: ^^^^^ action, allowed->:valuesAreCorrect:guiDNS:guiHOSTNAME:guiIPADDR:guiGATEWAY:guiNETMASK:pxeNETWORK:r:e: []: valuesAreCorrect
^^^^^ scroll up to review ^^^^^
Respond: ^^^^^ Press Enter to return to options menu, allowed->:r: [r]: r
#...............................................................................
#~# v2 2013-04-30 BMP Networking configuration variables and values in installNetworkingConfiguration.cfg
# See the annotated template file at: /usr/local/linmin/templates/installNetworkingConfiguration.cfg
# or use install menu option 'g' to review the annotated template file
# Edit and change values in the file at: /usr/local/linmin/installNetworkingConfiguration.cfg
# or use install menu option 'r' to revise the values in this file
#
guiHOSTNAME=baremetalgui.baremetalguidomain
guiDNS=192.168.0.254
guiIPADDR=192.168.0.244
guiGATEWAY=192.168.0.254
guiNETMASK=255.255.255.0
pxeNETWORK=212.49.49.0
#
#^^^^^^^^^^^^^^^^^^^^^^^^^^^^^^^^^^^^^^^^^^^^^^^^^^^^^^^^^^^^^^^^^^^^^^^^^^^^^^^
Start of Preparation Process ^^^^^ Scroll up to view relevant messages ^^^^^
...returned from: Review and revise networking values
* Consult the online Users Guide Quick Start section.
* For networking values please contact your Network Administrator for assistance.
* After resolution of issues re-execute this script or the provisioner preparation .exp package.
* If you are unable to successfully complete the execution of this server preparation script,
for reasons other than network values, create a support help file and email it to support.
...install values to be used to set static networking: (^^^^^ complete .cfg file text above ^^^^^)
guiHOSTNAME=baremetalgui.baremetalguidomain
guiDNS=192.168.0.254
guiIPADDR=192.168.0.244
guiGATEWAY=192.168.0.254
guiNETMASK=255.255.255.0
pxeNETWORK=212.49.49.0
Options:
* "g" see an annotated guide of the required install configuration networking values.
* "r" review and accept or revise the install configuration networking values shown above.
* "s" see the networking values in play at this time.
* "h" create a support help file.
* "e" exit this script.
* "c" continue with the preparation process.
^^^^^ Scroll up to view relevant messages ^^^^^
#^^^^^^^^^^^^^^^^^^^^^^^^^^^^^^^^^^^^^^^^^^^^^^^^^^^^^^^^^^^^^^^^^^^^^^^^^^^^^^^
^^^^^ Options for Networking information, or create a support help file
Respond: ^^^^^ select option from menu above, allowed->:g:r:s:h:e:c: []: c
#...............................................................................
You will then be prompted to accept the licensing and other terms, and after one final prompt, you will be done with the interactive part of the script:
#...............................................................................
User Interaction is complete until the end of the preparation process,
...unless there are abnormal issues encountered.
#^^^^^^^^^^^^^^^^^^^^^^^^^^^^^^^^^^^^^^^^^^^^^^^^^^^^^^^^^^^^^^^^^^^^^^^^^^^^^^^
^^^^^ read notes, press Enter to acknowledge and continue
Respond: ^^^^^ 'a' to acknowledge or 'q' to exit, allowed->:a:q: [a]: a
Finally, after the script has automatically downloaded, installed and configured a large number of packages, you will be presented with the final messages:
This server is now prepared and ready for Bare Metal Provisioning (BMP) installation.
A reboot is required to fully establish any system network changes.
After reboot execute the install package.
Request your License key for this MAC: 00:50:56:00:00:BB
#^^^^^^^^^^^^^^^^^^^^^^^^^^^^^^^^^^^^^^^^^^^^^^^^^^^^^^^^^^^^^^^^^^^^^^^^^^^^^^^
...log implementation date and time
...ENDing network backups
#...............................................................................
# END of process: 2013-05-07 08:36:55
==> /etc/resolv.conf <==
nameserver 192.168.0.254
==> /etc/sysconfig/network-scripts/ifcfg-eth0 <==
# Intel Corporation 82545EM Gigabit Ethernet Controller (Copper)
DEVICE=eth0
BOOTPROTO=none
HWADDR=00:0C:29:9D:2E:17
IPADDR=192.168.0.244
BROADCAST=192.168.0.255
NETWORK=192.168.0.0
GATEWAY=192.168.0.254
DNS=192.168.0.254
ONBOOT=yes
NETMASK=255.255.255.0
HOSTNAME=baremetalgui.baremetalguidomain
==> /etc/sysconfig/network-scripts/ifcfg-eth1 <==
# Intel Corporation 82545EM Gigabit Ethernet Controller (Copper)
ONBOOT=yes
BOOTPROTO=none
DEVICE=eth1
IPADDR=212.49.49.1
NETWORK=212.49.49.0
NETMASK=255.255.255.0
HWADDR=00:50:56:00:00:BB
BROADCAST=212.49.49.255
GATEWAY=192.168.0.254
HOSTNAME=baremetalgui.baremetalguidomain
DNS=192.168.0.254
ifconfig:
eth0 Link encap:Ethernet HWaddr 00:0C:29:9D:2E:17
inet addr:192.168.0.244 Bcast:192.168.0.255 Mask:255.255.255.0
eth1 Link encap:Ethernet HWaddr 00:50:56:00:00:BB
inet addr:212.49.49.1 Bcast:212.49.49.255 Mask:255.255.255.0
v66 2012-05-07 linminPrepProvisioner.sh :start: 2013-05-07 08:21:18 :end: 2013-05-07 08:36:55
^^^^^ note above!
Respond: Press Enter to REBOOT, allowed->:reboot: [reboot]:
You are now ready to install Cisco Server Provisioner.
If you are using VMware, take a snapshot of your system before proceeding.
Should your preparation script fail to complete due to networking issues:
Step 1: undo the server preparation process:
[root@localhost linmin]# ./linminPrepProvisioner.sh resetIt
################################################################################
#...............................................................................
# START v66 2012-05-07 linminPrepProvisioner.sh at 2013-05-07 13:55:13
#...............................................................................
################################################################################
#...............................................................................
find: /home/tftpboot: No such file or directory
...these files and will be removed
-rw-r--r-- 1 root root 403 May 7 13:51 /usr/local/linmin/linminPrepProvisioner_status
-rw-r--r-- 1 root root 3406 May 7 13:54 /usr/local/linmin/cisco-prep-provisioner-6-5-0-bDateTime-p1305070613.exp.log
-rwxrwxrwx 1 root root 10048 Apr 18 19:41 /usr/local/linmin/lbmp-local-help-install.php
-rw-r--r-- 1 root root 99 May 7 13:51 /usr/local/linmin/cisco-prep-provisioner-6-5-0-bDateTime-p1305070613_extracted
-rwxrwxrwx 1 root root 78743 May 7 05:43 /usr/local/linmin/linminPrepProvisioner.sh
-rwxrwxrwx 1 root root 48115 Dec 20 2007 /usr/local/linmin/cabextract-1.2-1.el5.rf.i386.rpm
-rwxrwxrwx 1 root root 63206 May 7 05:43 /usr/local/linmin/linminPrepNetwork.php
-rwxrwxrwx 1 root root 22246 May 7 05:43 /usr/local/linmin/lbmp-live-ubuntu-install.php
-rwxrwxrwx 1 root root 8937 Jul 3 2011 /usr/local/linmin/active-servers-on-lan.sh
-rwxrwxrwx 1 root root 11473 Jan 29 19:25 /usr/local/linmin/ocs-batch-nfs.sh
-rwxrwxrwx 1 root root 50 Apr 23 05:37 /usr/local/linmin/branded/EULA_cisco.txt
-rwxrwxrwx 1 root root 911 Apr 19 16:42 /usr/local/linmin/branded/thirdPartyDownloadTerms_cisco.txt
-rwxrwxrwx 1 root root 2971 Apr 23 05:39 /usr/local/linmin/branded/configurationVariables_cisco.cfg
-rw-r--r-- 1 root root 8470 May 7 13:54 /usr/local/linmin/linminPrepProvisioner.log
-rw-r--r-- 1 root root 5290 May 7 13:51 /usr/local/linmin/prepNetworkingTrace.txt
-rwxrwxrwx 1 root root 874400 Dec 26 2006 /usr/local/linmin/templates/ioncube_loader_lin_5.1.so
-rwxrwxrwx 1 root root 2834 Sep 16 2012 /usr/local/linmin/templates/etc_dhcpd.conf.tmpl
-rwxrwxrwx 1 root root 3560 May 1 13:31 /usr/local/linmin/templates/installNetworkingConfiguration.cfg
-rw-r--r-- 1 root root 205 May 7 13:51 /usr/local/linmin/linminPrepProvisioner_savedValues.txt
-rw-r--r-- 1 root root 604 May 7 13:51 /usr/local/linmin/installNetworkingConfiguration.cfg
#^^^^^^^^^^^^^^^^^^^^^^^^^^^^^^^^^^^^^^^^^^^^^^^^^^^^^^^^^^^^^^^^^^^^^^^^^^^^^^^
^^^^^ the files listed above will me removed
^^^^^ and the networking will be restore to the starting point
^^^^^ key 'yes-reset-it' to remove dirs and files: yes-reset-it
...ignore any error messages, the end results will be a reset
mv: cannot stat `archive/*.zip': No such file or directory
find: /home/tftpboot: No such file or directory
...ignore any error messages above
total 492
-rwxrw-rw- 1 root root 456779 May 7 08:18 cisco-prep-provisioner-6-5-0-bDateTime-p1305070613.exp
-rwxrw-rw- 1 root root 31608 Apr 18 13:25 LinMin_QADept_Trial_Mbb_c50_mEPMWPM_E15Apr18_R650_G13Apr18_lbmp.exp
... NOW RESET ...
[root@localhost linmin]#
Then double check your network values and connectivity, then restart the preparation script.
If Step 1 fails, then:
Step 2: generate a .help file:
[root@baremetalgui linmin]# sh cisco-prep-provisioner-{build#}-{build-date}-{package-date}.exp
Options:
* "g" see an annotated guide of the required install configuration networking values.
* "r" review and accept or revise the install configuration networking values shown above.
* "s" see the networking values in play at this time.
* "h" create a support help file.
* "e" exit this script.
* "c" continue with the preparation process.
^^^^^ Scroll up to view relevant messages ^^^^^
#^^^^^^^^^^^^^^^^^^^^^^^^^^^^^^^^^^^^^^^^^^^^^^^^^^^^^^^^^^^^^^^^^^^^^^^^^^^^^^^
^^^^^ Options for Networking information, or create a support help file
Respond: ^^^^^ select option from menu above, allowed->:g:r:s:h:e:c: []: h
Briefly describe your issue:
.... use only alpha letters, numbers, underscores, and spaces
Respond: issue description []: The prep script didn't complete, I get an error I don't understand with guiNETMASK
Provide your name to ID the help file:
.... use only alpha letters, numbers, underscores, and spaces
Respond: your name []: John Smith
Provide a short company name to ID the help file:
.... use only alpha letters, numbers, underscores, and spaces
Respond: the short name of your company []: SPG GlobalComm
...creating: bmp-John_Smith-SPG_GlobalComm_linminPrepProvisioner_20130508-163559.help
Email this help file to support: bmp-John_Smith-SPG_GlobalComm_linminPrepProvisioner_20130508-163559.help
And submit the help file with your observations to Customer Support: TAC@Cisco.com
|