What to expect during LSM installation:
•Execute the LSM installer from the command line, in /root as root user
oBe prompted to accept terms and enter your values
oBe prompted to "relax", wait for hundreds of megabytes to be downloaded, installed and configured, reboot (~10 to 25 minutes depending on your environment)
oYou will be prompted to reboot
oLogin to the RHEL/CentOS GUI, be prompted to make selections, reboot
oLogin, set password LSM GUI password
oYour LSM installation is complete
•Open your local Firefox browser to the IP address of your LSM Server, login and start using LSM
At LSM Installation time, you will be prompted for:
•LSM DHCP IP Service Range starting IP address: ___.___.___.___.
•Number of contiguous IPs in your LSM DHCP IP Service Range: ___
Before installing LinMin Snapshot Manager:
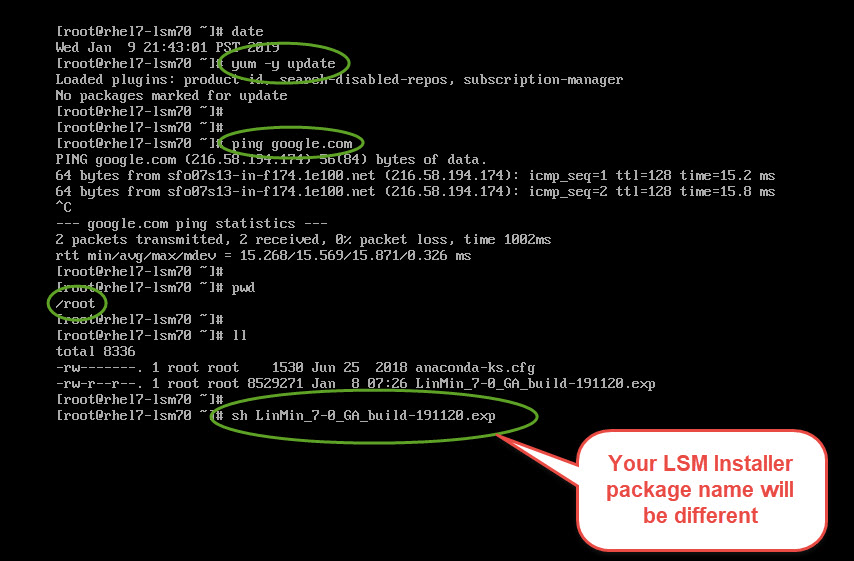
Always login as root to the LSM Server:
# whoami
root
Check for updates and make sure your yum access is working:
# yum -y update
No packages marked for update
If you do not have yum access, STOP. The installation cannot proceed without yum access.
Perform a cursory check for WAN/Internet connectivity:
# ping google.com
PING google.com (1...
64 bytes from...
If you do not have WAN/Internet connectivity, download Clonezilla.
If you do not have WAN/Internet connectivity and if you did not download Clonezilla, STOP. The installation cannot proceed.
Proceed with the installation of LinMin Snapshot Manager:
Copy the LSM installer to the LSM Server in /root:
/root
Note: you can interrupt ("Q") then re-run the LSM installer any number of times until the installation is completed
Proceed with the LSM installer:
# cd /root
# sh LinMin_LSM_2022-R0_GA_b2022032.exp # Example file name
Files will be extracted, then you will be prompted to review the overview of the installation:
#...............................................................................
The LinMin Install process is in multiple stages, each with instructional notes
The Stages are --
Stage 1: LinMin Setup
... Both discover and interactively collect values and set options unique to this install
Stage 2: LinMin Yum Packages Modification Process
... Install and remove packages to tailor the server for LinMin services
...... includes a Server GUI desktop
... NOTE: this Stage takes considerable time to remodel the Minimal Install OS
...... to a LinMin ready server with Server GUI Desktop
... NOTE: it installs Clonezilla Live Ubuntu via Internet download or from a local file
... NOTE: it concludes with a Reboot to ensure the revisions were completed correctly
... Continuing the LinMin install process is automatically launched with Root User login
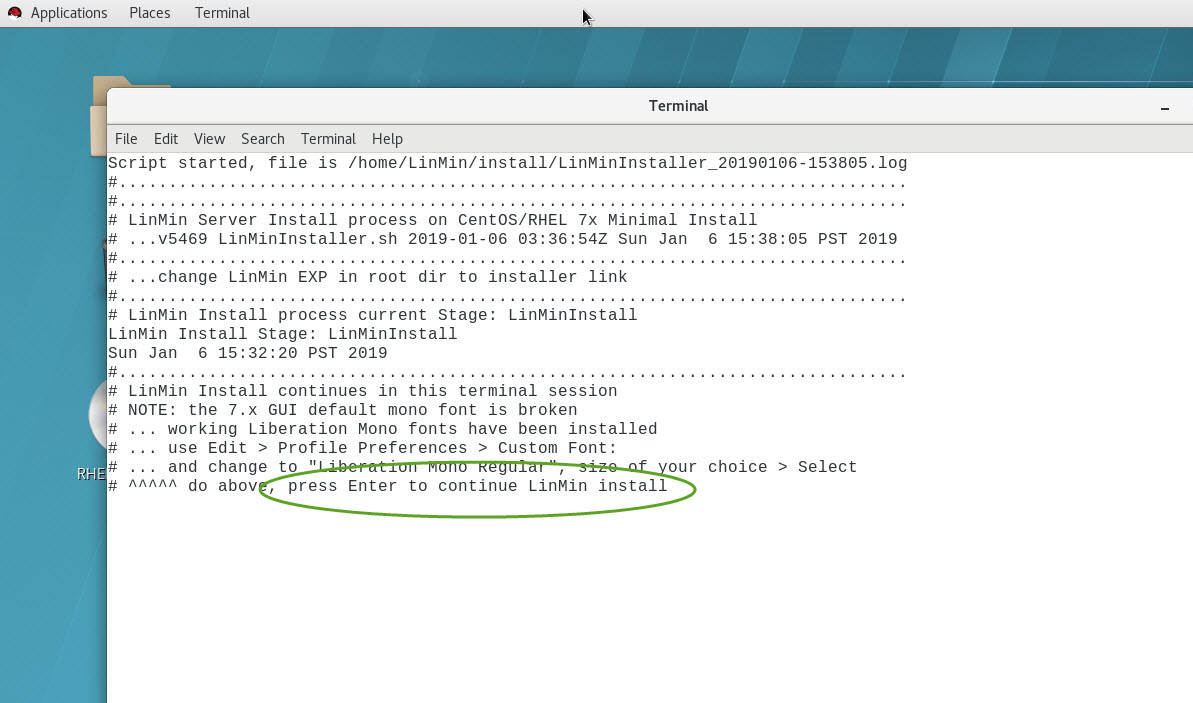
Stage 3: LinMin Services Install and Configure
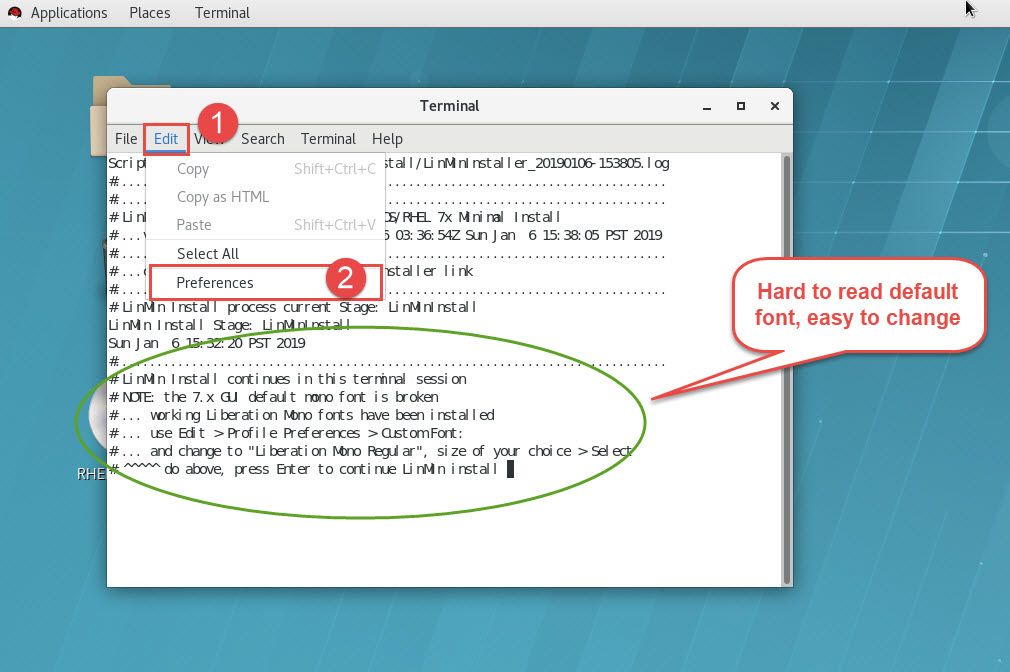
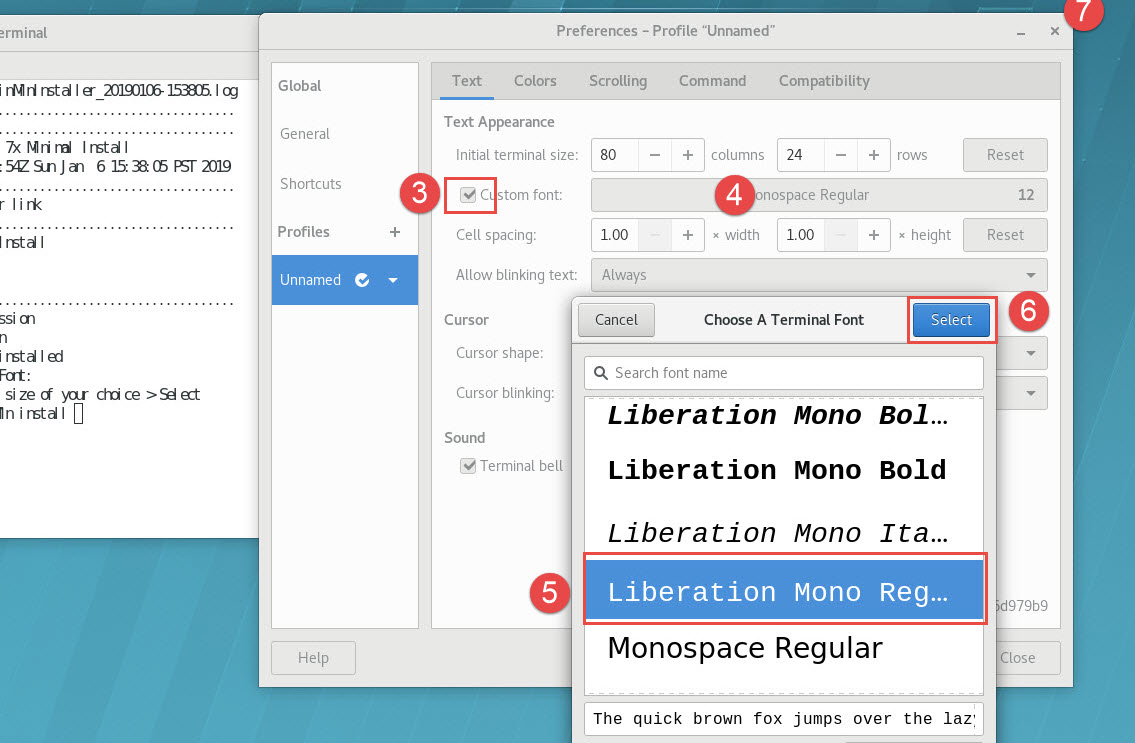
... NOTE: The instructions to change the terminal font to Liberation Mono Regular
...... an OS bug renders the default Mono Regular font badly,
...... LinMin Stage 2 installs the Liberation Mono fonts allowing for this change
... Install and configure LinMin services using discovered values and those from Stage 1
... NOTE: again this Stage is concluded with a Reboot to ensure the install is correct
...... and services are active after boot up
... Continuing the LinMin install process is automatically launched with Root User login
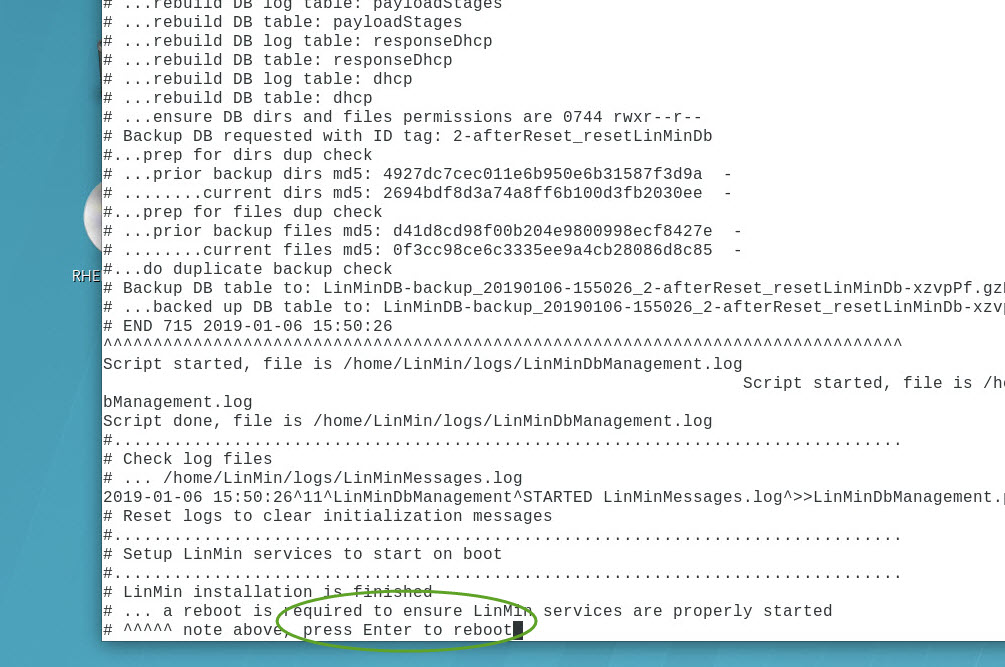
Stage 4: LinMinPostInstall
... A confirmation that the install Stages correctly completed
... Some notes and hints for additional configuration are presented
It is recommended that you review the online User Guide, search keyword: linmin_install
#^^^^^^^^^^^^^^^^^^^^^^^^^^^^^^^^^^^^^^^^^^^^^^^^^^^^^^^^^^^^^^^^^^^^^^^^^^^^^^^
# ^^^^^ Review above, key R reviewed to install LSM or Q quit to exit, then press Enter /R/Q/: R
You will be prompted to enter your contact information (not the information provided in the example values below), then asked to Keep or Change the values you entered:
# Technical Contact Information:
# Nuage Hosting <== Company - required
# Menlo Park, CA USA <== Site Location, Country State/Provence City - required
# leo@gmail.com <== Email - required
# Leo Gray <== Name - required
# Dev Ops Engineer <== Title - required
# +1 650-555-1212 <== Phone Number - required
# <== Note - optional
# Options: K keep or C change values
... select /K/C/ [C]: K
You will be prompted to read and accept the End User License Agreement:
# Accept Terms and Conditions of the EULA
# ... located in: /home/LinMin/licenses/EULA_LinMin.txt
# ... review will be presented via the 'less' command
# ... navigation keys - enter advances one line, space bar pages down, up/down arrows one line, pageup/page down
# ...... navigation - at (END) 'q' then Enter to quit
# Options: R review, Accept, Q quit and exit
... select /R/Accept/Q/ [R]: Accept # Read the EULA before accepting it
For a POC or Trial in a trusted environment, it is recommended you disable SELinux and the firewall:
# If unsure of what ports are open consult your system administrator who manages your firewalls
# To accept responsibility for maintaining LSM required ports open in the firewall, use the Active option
# If in a secure environment, Disable Firewall
# Options: D disable, Active, Q quit and exit:
... select /D/Active/Q/ []: D
Network preparation begins
# Network service restart is required for LSM install to ensure network values are current
Options: R restart network service, Q quit and exit
Select Option: /R/Q/ [R]: R
Next, the contents of your /etc/sysconfig/network-Scripts/ifcfg-ens33 (for example) will be presented and you will be allowed to modify the values, then finally commit (Process) them:
#.........................................................
LinMin Snapshot Manager (LSM) ifcfg temp work file contents
... required parameters and values for LSM server fixed static IP
11) TYPE=Ethernet
12) NM_CONTROLLED=no
13) PROXY_METHOD=none
14) BOOTPROTO=none
15) ONBOOT=yes
16) BROWSER_ONLY=no
17) IPV4_FAILURE_FATAL=yes
18) IPV6INIT=no
19) IPV6_AUTOCONF=no
20) IPV6_DEFROUTE=no
21) IPV6_FAILURE_FATAL=no
22) IPV6_PRIVACY=no
23) NAME=ens33
24) DEVICE=ens33
25) IPADDR=192.168.49.64
26) PREFIX=24
27) GATEWAY=192.168.49.1
28) DNS1=8.8.8.8
29) DNS2=8.8.4.4
# ^^^^^ Review above ifcfg work values
Options: key ## from above to change ifcfg work value, K keep values above and continue, Q quit and exit
Select Option: /11/12/13/14/15/16/17/18/19/20/21/22/23/24/25/26/27/28/29/K/Q/: K
To change a value in your ifcfg-ensxx working temp file, select the item number (in this case, item 29, DNS2) and provide the new value (9.9.9.9):
...
27) GATEWAY=192.168.49.1
28) DNS1=8.8.8.8
29) DNS2=8.8.4.4
# ^^^^^ Review above ifcfg work values
Options: key ## from above to change ifcfg work value, K keep the values above and continue
Select Option: /11/12/13/14/15/16/17/18/19/20/21/22/23/24/25/26/27/28/29/K/Q/: 29
... option selected: '29'
... enter new value for DNS2 [8.8.4.4]: 9.9.9.9
Confirm you wish to keep (or change) the new value:
28) DNS1=8.8.8.8
29) DNS2=9.9.9.9
# ^^^^^ Review above ifcfg work values
...changed 'DNS2=8.8.4.4' to 'DNS2=9.9.9.9'
Options: key ## from above to change ifcfg work value, K keep the values above and continue
Select Option: /11/12/13/14/15/16/17/18/19/20/21/22/23/24/25/26/27/28/29/K/Q/: K
Now proceed with replacing the actual ifcfg file with the working copy you prepared:
...
Replace ens33 ifcfg process is:
1) Backup current ens33 ifcfg
2) Replace current ens33 ifcfg with change values
3) Restart Network service
4) On failed restart, restore Backup and restart network service
Options: P process ens33 ifcfg replacement
Select Option: /P/Q/: P
Next, select the starting IP of your LSM DHCP IP Service Range:
# LSM DHCP minimum IP requirement is 4
# ... 3 for LSM Payload service and 1 for No LSM Service response
# When the LSM server IP is inside the range the minimum is 5
# ... plus 1 for the LSM server
#.........................................................
# Provide the LSM exclusive DHCP range starting IP last octet(1-254) for LSM DHCP range in 192.168.49.
... enter LSM DHCP IP service range start IP octet []: 128
And provide the number of desired IPs in the service range:
# Provide the LSM exclusive DHCP range number of IPs (4-254)
... enter the number of IPs in the LSM DHCP IP service range []: 16
Review and keep (or change) your selected values:
# LSM DHCP settings:
# 16 <== LSM DHCP IPs in the service range
# 192.168.49.128 <== LSM DHCP IP service range start
# 192.168.49.143 <== LSM DHCP IP service range end
# 192.168.49.128 <== LSM DHCP No Service IP
# 192.168.49.64 <== LSM server IP is outside LSM DHCP range
... K keep settings or C change settings: Select /K/C/ [C]: K
You are now done entering your values.
Press enter when prompted and the long process of downloading and installing packages begins. Take a break and come back in 10 to 20 minutes, ready for system reboot:
# LSM Install setup is complete
# Now begins yum processing to remodel the Minimal Install
# ... into a server with server GUI and support services for LSM processes
# This will take considerable time,
# ... time may vary depending on the speed of transfer from your yum repository
# The next interaction will be notes with a "reboot" to continue
# ... exceptions may occur that present messages and guidance
# Relax and take a break...
# ^^^^^ note above, press Enter to continue LSM install press Enter (and come back in 10-20 minutes)
Reboot (1st of 2 reboots during installation, last time in a command line):
# ^^^^^ Note above, press enter to reboot press Enter
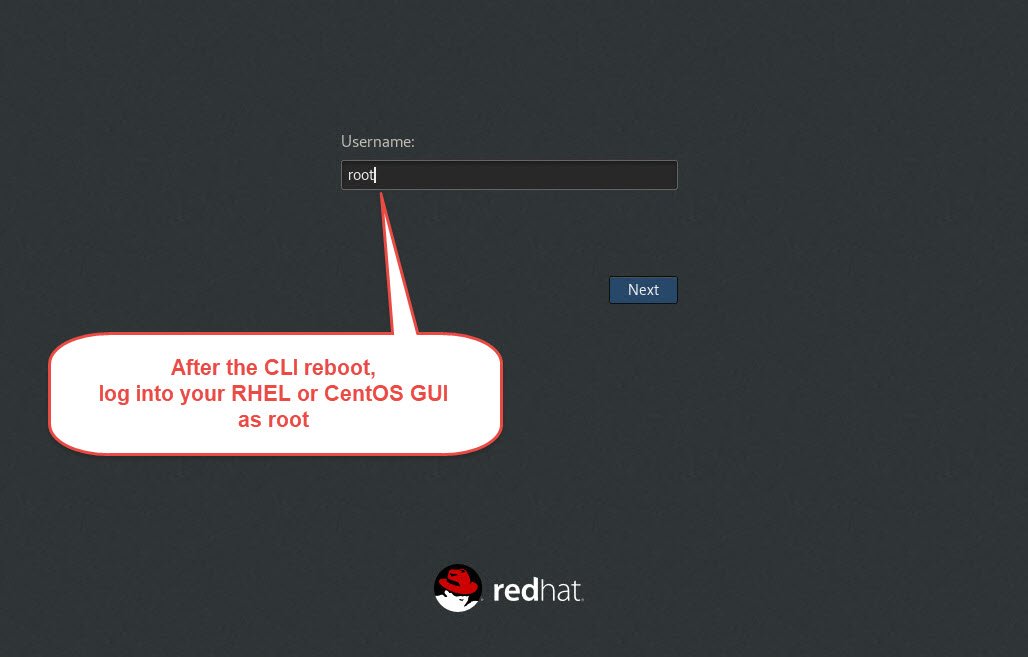
After the reboot, the RHEL or CentOS GUI login screen is presented
Login as root:
Change the default font to Liberation Mono Regular:
Then continue:
Press enter to reboot:
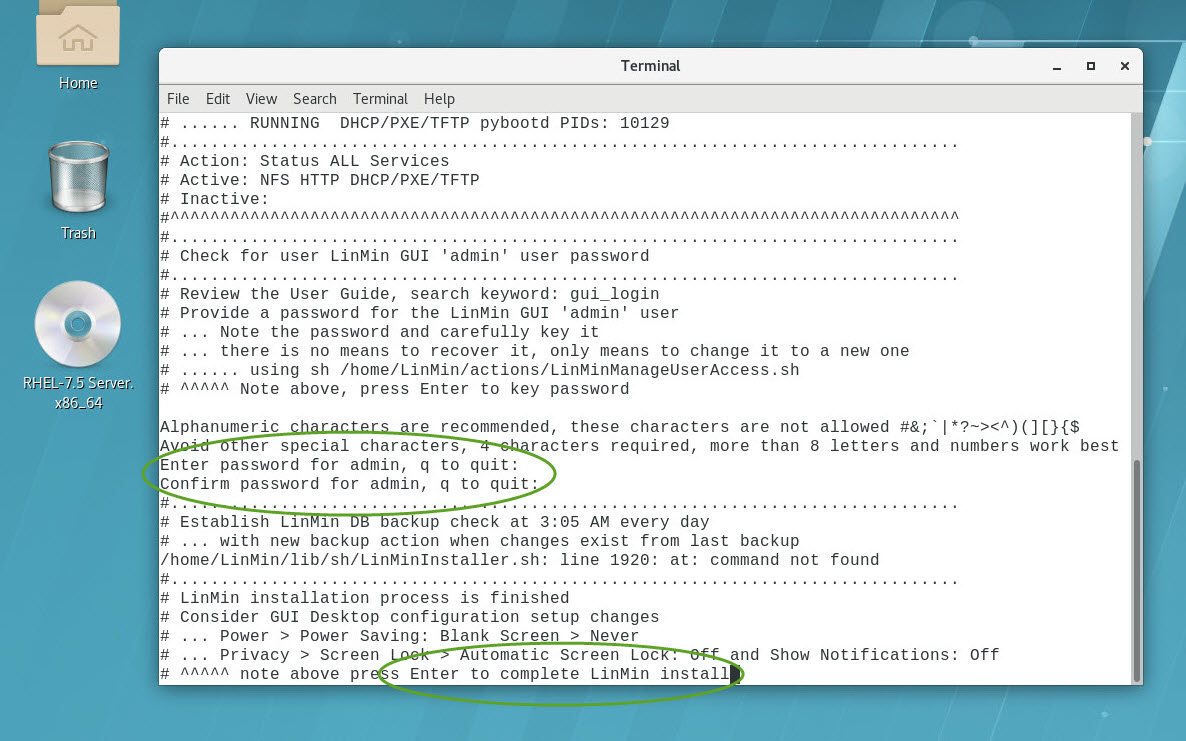
After the final reboot, login as root and press Enter to select a password for the default User admin:
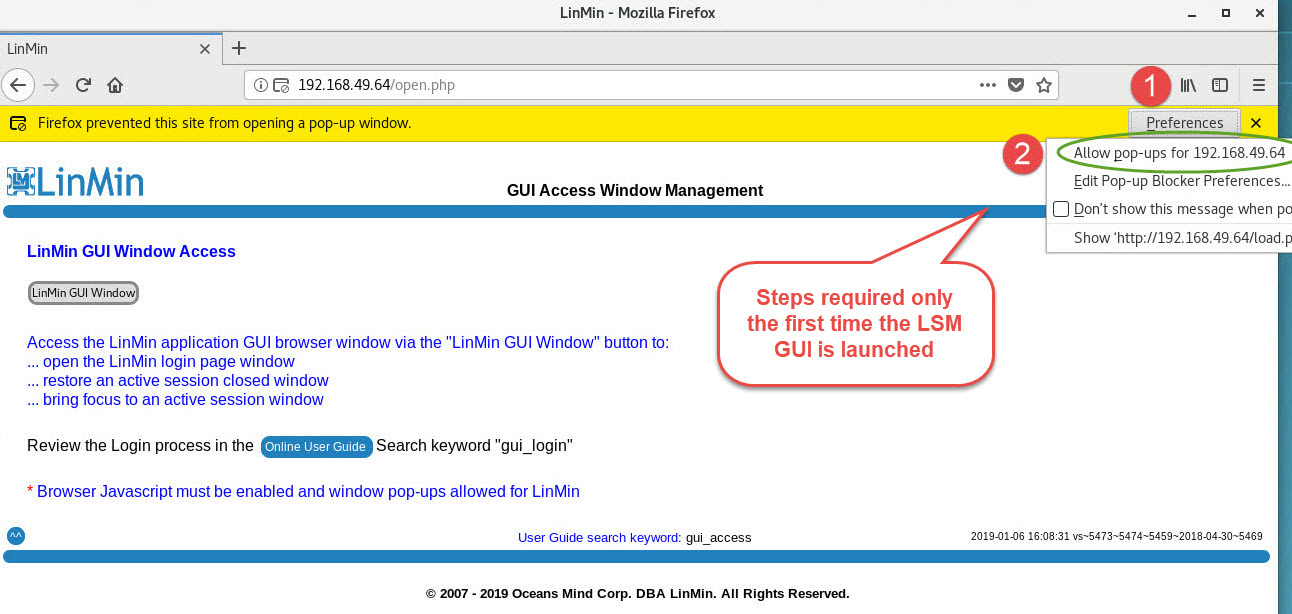
Before accessing the LSM GUI from a remote system, authorize remote access.
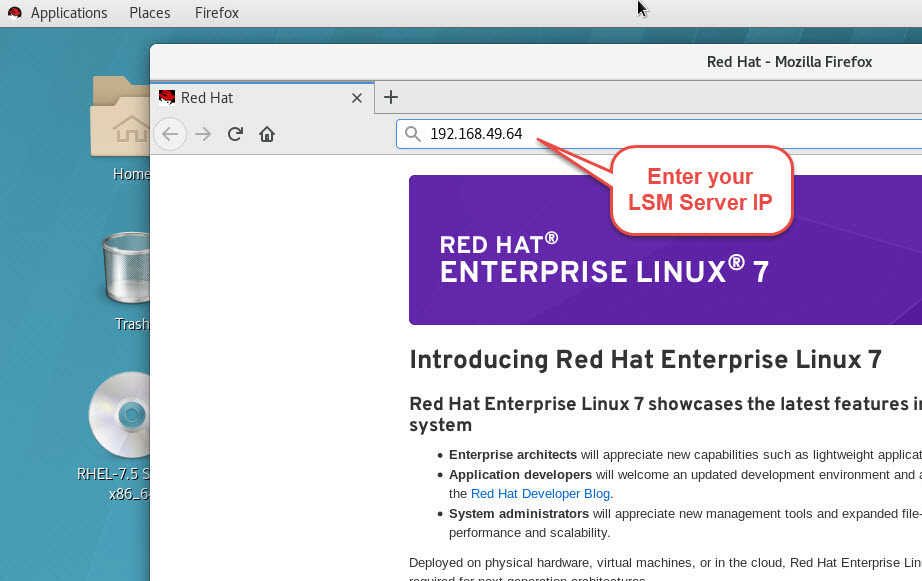
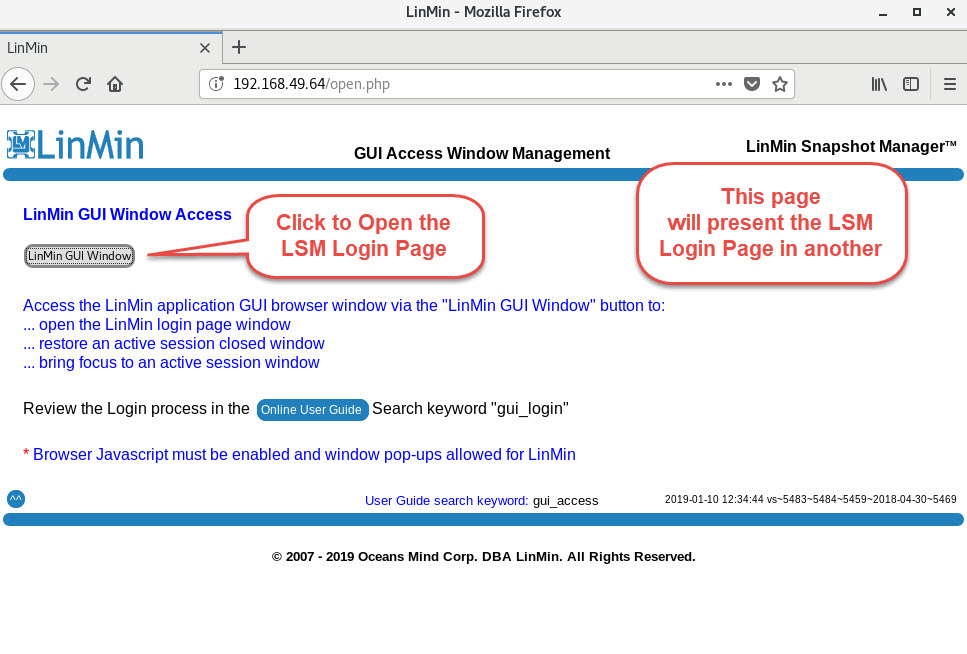
Open your Firefox browser on your LSM Server (later you can access the LSM Server from a remote browser (e.g., Chrome on Windows):
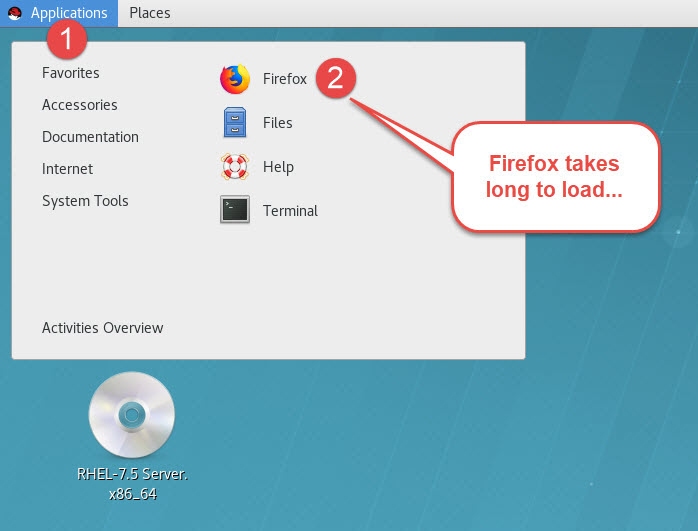
Enter your LSM Server IP address in the browser:
Allow pop-ups (LSM is a browser-based GUI application, not a Web site):
And login using the User name admin with the password you selected:
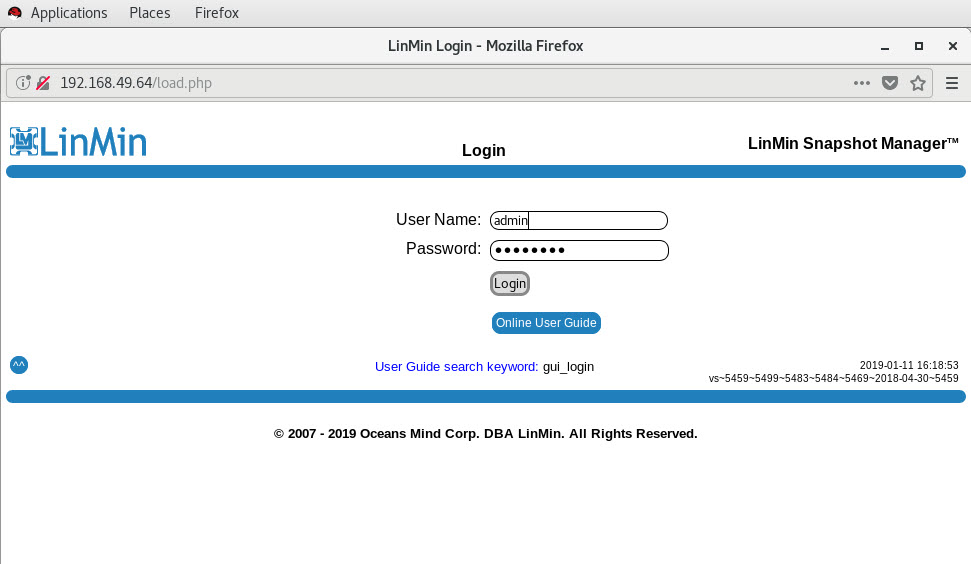
When you are presented with the About page, LinMin Snapshot Manager is ready for use:

If you see a "Login failed" message, you may have misentered your password:
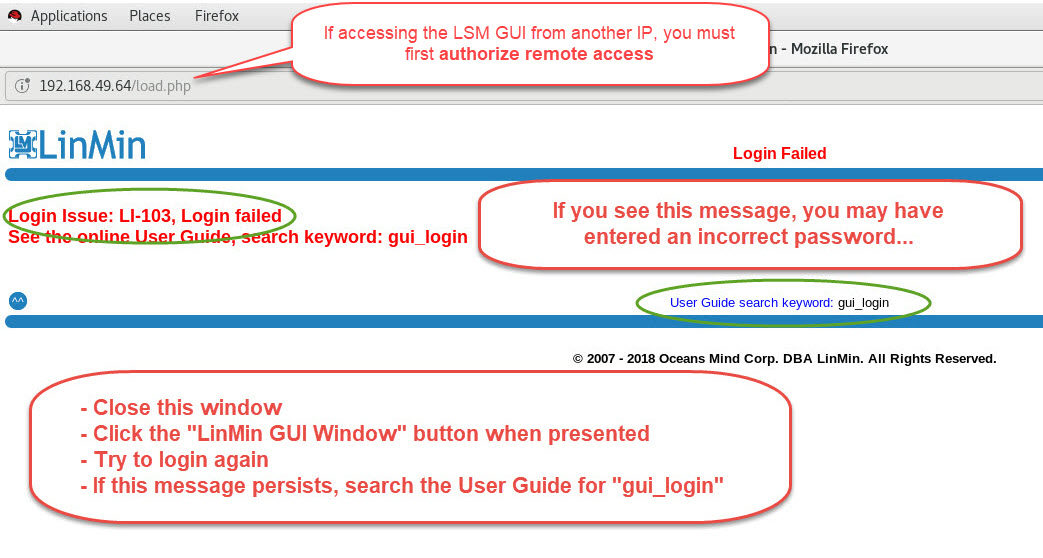
If login errors persist, review GUI Login Errors
After you close the page with the login error, click "LinMin GUI Window" to open the Login page:
If using a Virtual Machine, take a VM Snapshot.
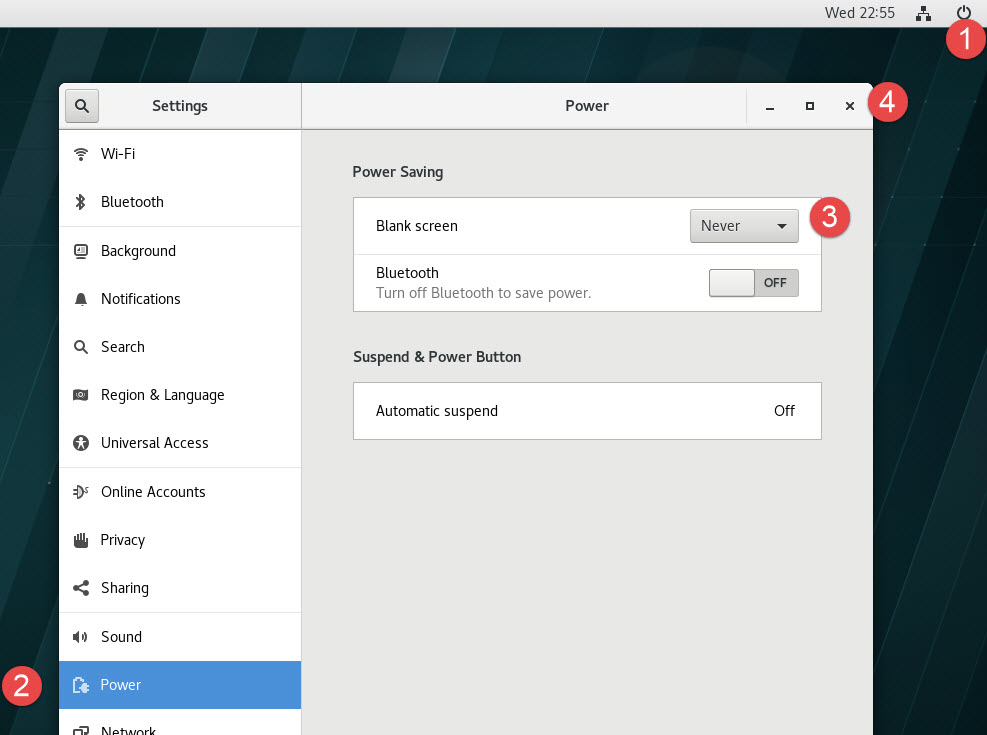
Optional and recommended: prevent your screen from going blank:
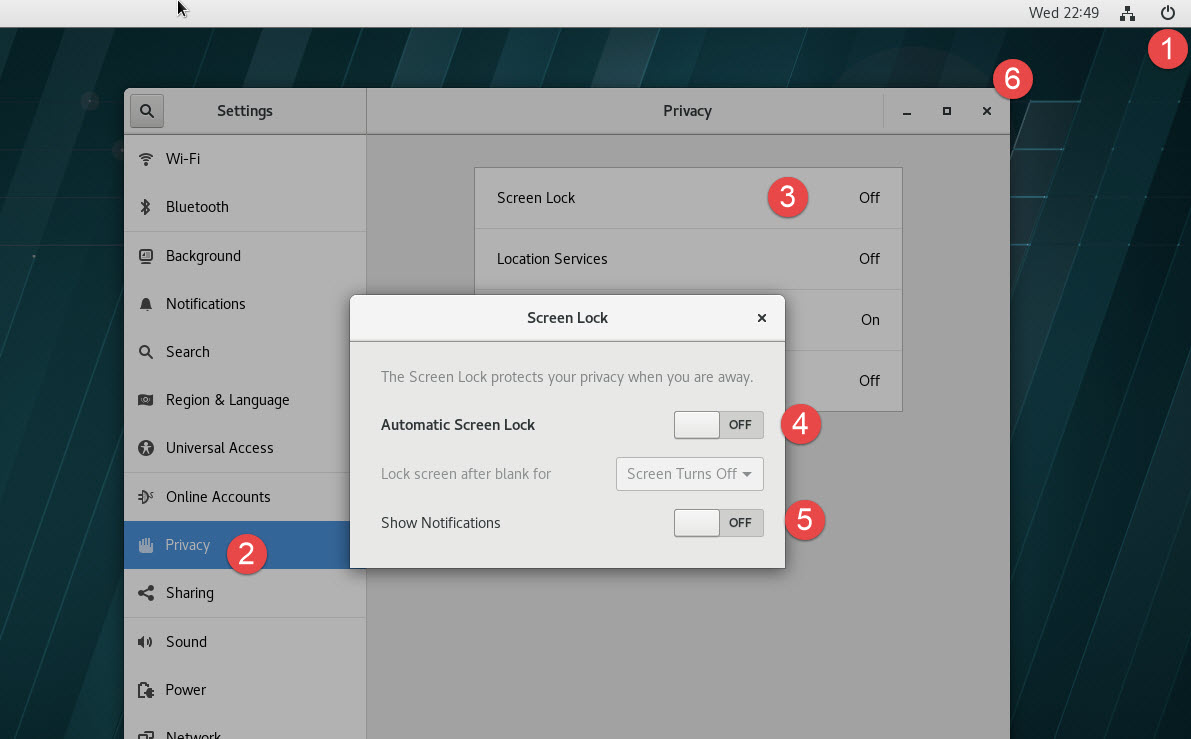
Optional and recommended: turn Screen Lock Off and Show Notifications Off:
Proceed with reviewing the Tutorials, then Using LSM
Search keyword(s): lsm_install lsm_install gui_access gui_login network_access root_required yum_access