Import and Configure the Provisioner Virtual Appliance (OVF Virtual Machine)
User's Guide feedback on: Cisco Server Provisioner 6.6 User's Guide ("Chuck Berry") - Import and Configure the Provisioner Virtual Appliance (OVF Virtual Machine)Quick_Start_Guide_OVFQuick Start Guide > Import the Provisioner Virtual Appliance (OVF) /Dear User's Guide Staff,
Import and Configure the Provisioner Virtual Appliance (OVF Virtual Machine)
This topic addresses how to start using the Cisco Server Provisioner Virtual Appliance by importing and configuring a Virtual Machine in Open Virtualization Format (OVF), with CentOS and Provisioner already installed.
This topic assumes you are comfortable with the VMware ESXi environment and tools (vCenter and vSphere). As such, we provide only selected screen shots (captured from VMware vSphere). The OVF is supported only on ESXi 5.0 or higher, though other hypervisors claim OVF compatibility.
If you encounter problems importing and configuring your Virtual Appliance, please visit http://support.linmin.com.
Coming soon: LinMin Bare Metal Provisioning 7.0. With enhanced security, faster 64-bit imaging, user extensibility and many other enhancements, LBMP 7.0 ("Buddy Holly" release) will also do bare metal provisioning of these new additional distros and platforms: RHEL/CentOS 7.x, ESXi 6.x, Debian 8.x, Ubuntu 14.xx/15.xx/16.xx, Oracle Enterprise Linux 5.x/6.x/7.x, Fedora 2x and more.
Contact us for more details and early access. And enjoy LBMP 6.6 ("Chuck Berry"release) in the meantime!
The Importance of Obtaining and Providing your Correct Network Values
Provisioner is highly network-dependent. The installation process should not be started until you have read and understood the network requirements and you have obtained all the required network values from your network administrator.
During Provisioner installation, you will be asked to enter the networking values once, and all the required services will then be automatically configured for your environment: DHCP, PXE, TFTP, HTTP, NFS, PostgreSQL, Samba, Iptables firewall, Web server, proxy server. For this reason, it is essential that you provide the correct networking values.
It is highly recommended that you review this Provisioner Quick Start Guide with your Network Administrator.
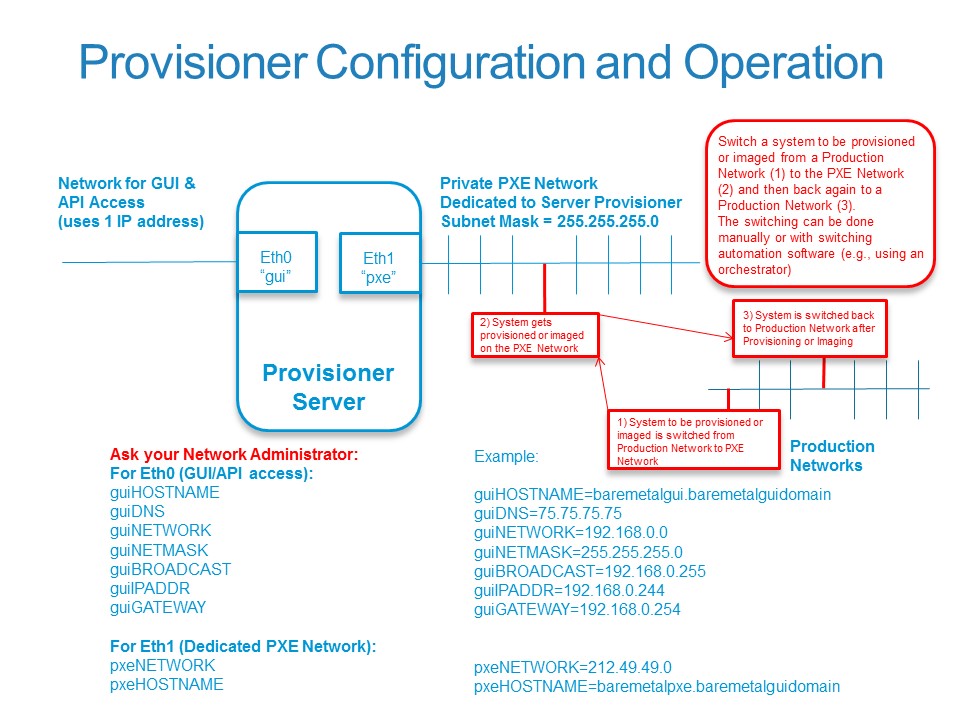
Network Configuration Overview
The only supported configuration is a dual-NIC system as follows:
•Eth0 will support GUI, API and repository access at Provisioner installation time. This interface is called the GUI NIC, and references to its configuration values will start with "gui", for example, "guiIPADDR".
•Eth1 will support the PXE (Pre-boot Execution Environment) (V)LAN where physical and virtual systems get provisioned and imaged. This interface is called the PXE NIC, and references to its configuration values will start with "pxe", for example "pxeNETWORK". The PXE NIC must reside on a dedicated, private (V)LAN (e.g., 212.49.49.0 or 192.168.0.0). This PXE (V)LAN must have a netmask 255.255.255.0. No other systems or services may exist on this (V)LAN, other than production systems initially provisioned or imaged using Provisioner or Clients that are awaiting to be moved to a Production (V)LAN manually or by using an automation solution such as the Cisco Process Orchestrator ("Orchestrator"). Your automation software (such as Orchestrator) or manual methods will move a system from a production (V)LAN to this Provisioning (V)LAN to be provisioned or imaged, then move the system back to the Production (V)LAN when the Client system has been provisioned or imaged.
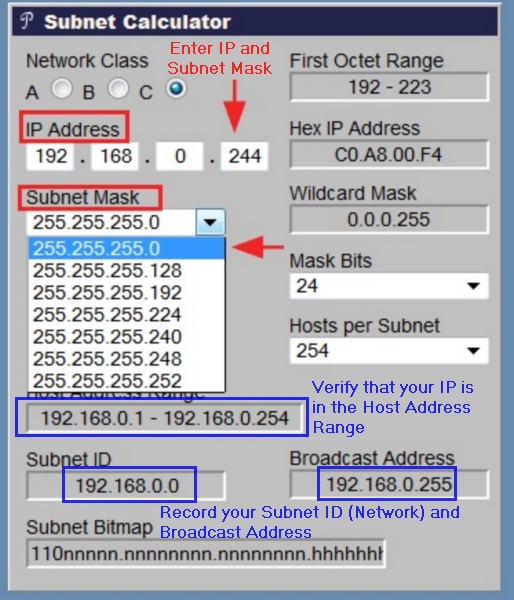
Please verify the network values you have been provided by your Network Administrator using a subnet calculator, such as http://www.subnet-calculator.com/
Enter the GUI IP address and Subnet Mask you have been provided by your Network Administrator. If you were given a Subnet Mask that does not match one provided in the drop-down list after you entered your IP address, you have been given incorrect values.
Verify that your IP Address is in the Host Address Range.
Record your Subnet ID (Network) and Broadcast IP Address.
Before proceeding, please make sure you have obtained all the correct network values, as you will need to replace the default values with your values.
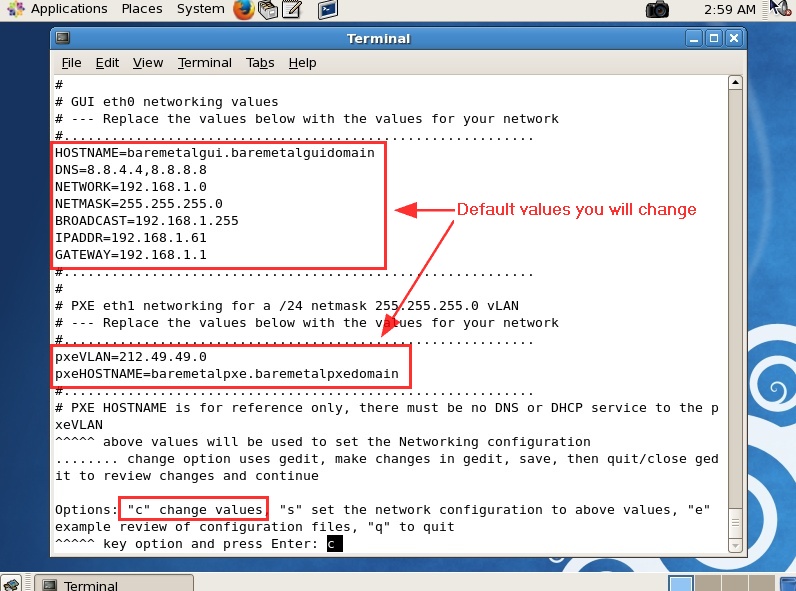
For eth0 (the IP used to access the GUI and the API), the values you need to replace with your values are:
HOSTNAME=baremetalgui.baremetalguidomain
DNS=8.8.4.4,8.8.8.8
NETWORK=192.168.1.0
NETMASK=255.255.255.0
BROADCAST=192.168.1.255
IPADDR=192.168.1.61
GATEWAY=192.168.1.1
For eth1 (the dedicated PXE VLAN with netmask 255.255.255.0), the values you need to replace with your values are:
NETWORK=212.49.49.0 (this value is also referred to as "pxeVLAN")
HOSTNAME=baremetalpxe.baremetalguidomain (this value is also referred to as "pxeHOSTNAME")
Do not proceed until you have obtained these network values!
Instructions
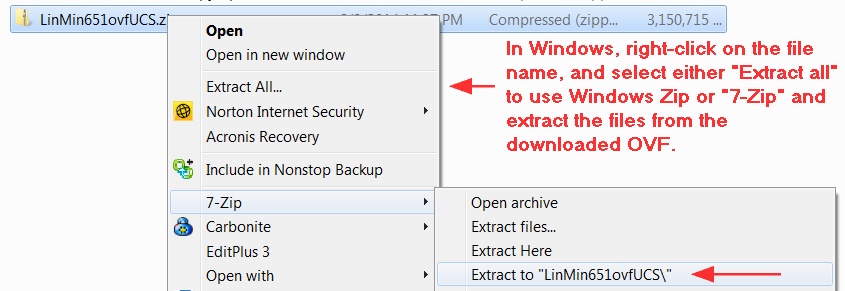
1. Download the Provisioner Virtual Appliance (OVF) zip file and place it where VMware can access it.
Keywords: OVF, OVF_Import
2. Extract the zip file into its 3 components, including the .ovf file
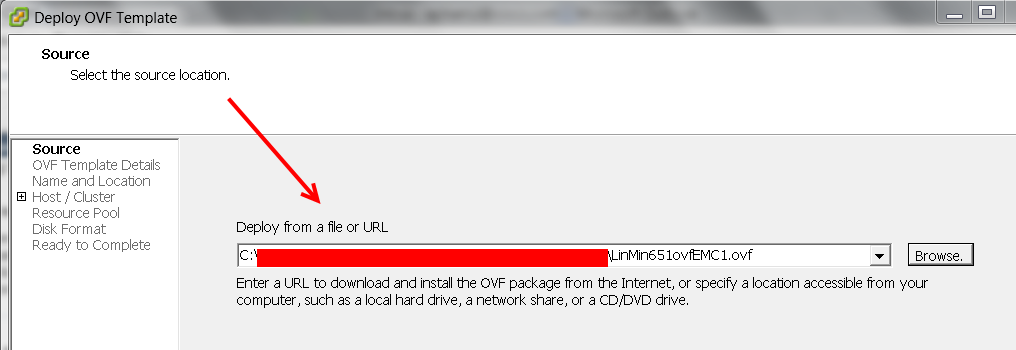
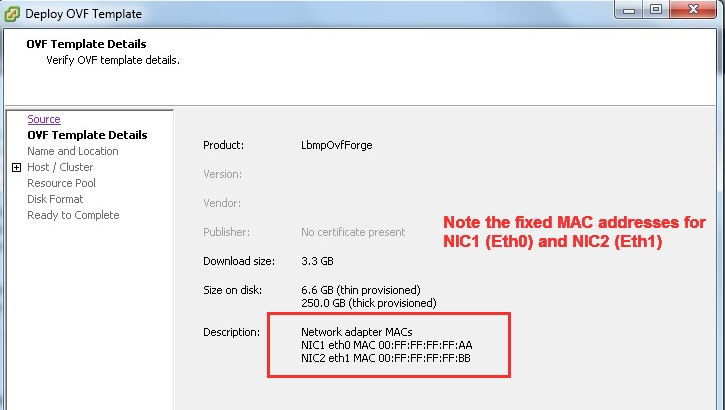
3. Select the OVF Template to Deploy
4. Note the MAC addresses provided with the OVF: you will be asked to assign these MAC addresses to your Network Adapters
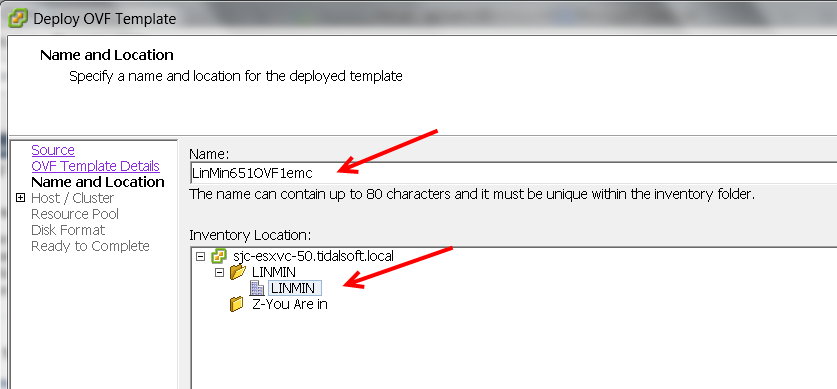
5. Select the OVF Template Name and Location
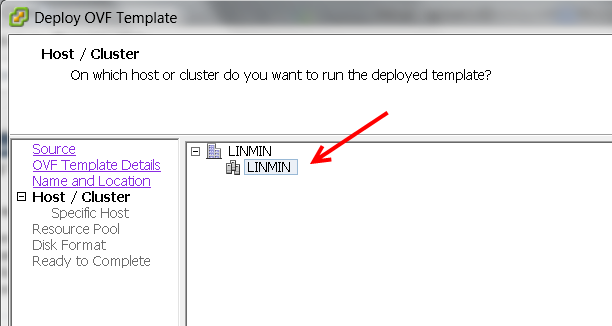
6. Select the OVF Template Host or Cluster
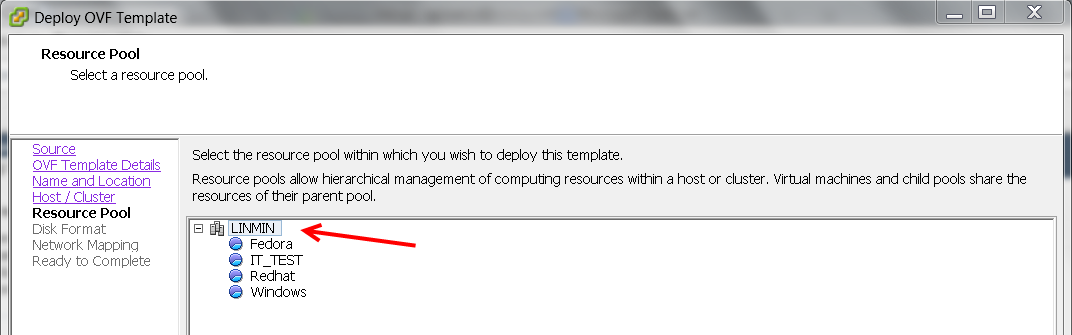
7. Select the OVF Template Resource Pool
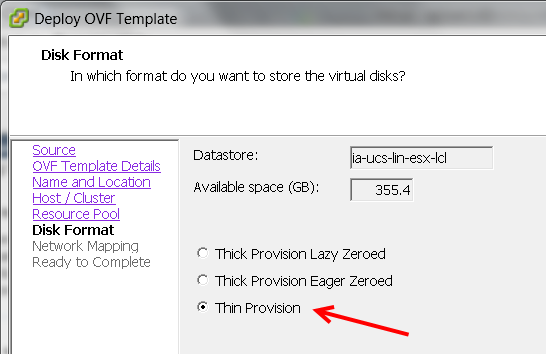
8. Select the OVF Template Disk Format
Consult your storage administrator to determine company policy and available resources.
"Thin Provisioning" is for "Grow as you go", though you may encounter errors if you run out of disk space.
"Thick Provisioning" assigns and consumes the entire disk space immediately.
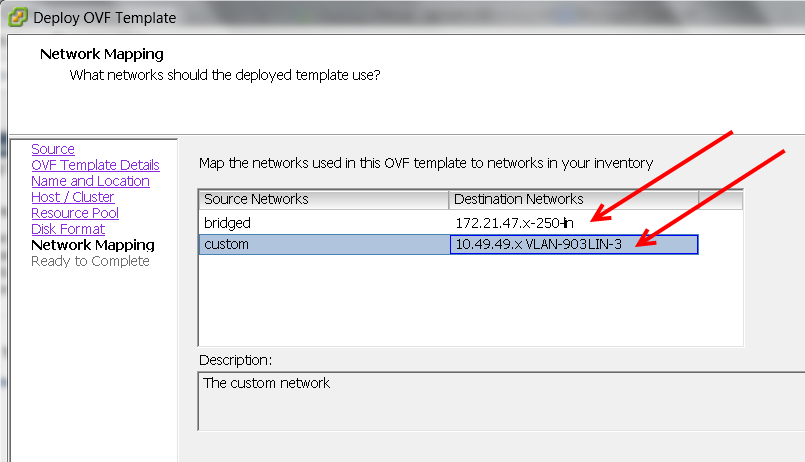
9. Map the administrative network and the PXE network to be used with the OVF Template
NOTE: if a Network does not appear, it can be mapped later, after the OVF import (see step 12).
Recommended: take a screen shot showing both networks, e.g. QSG_OVF_09.jpg
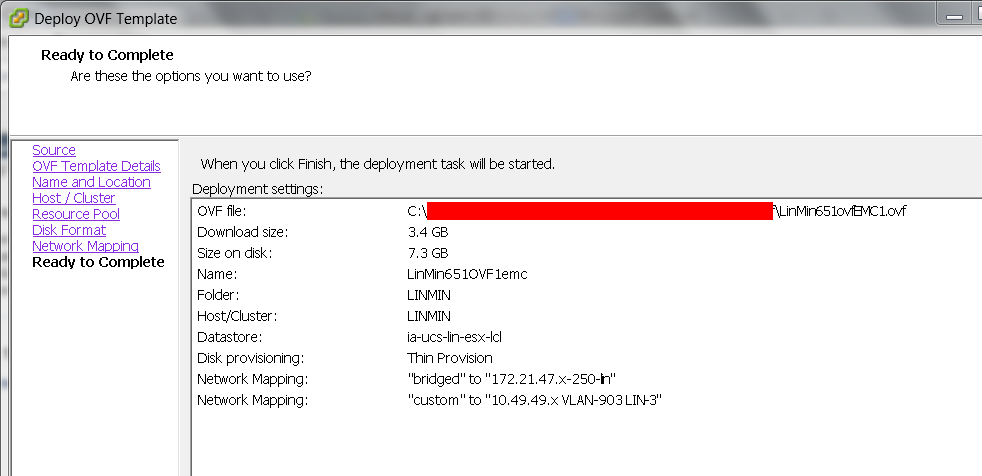
10. Verify your options then click "OK" to deploy the OVF Template and create the Virtual Machine
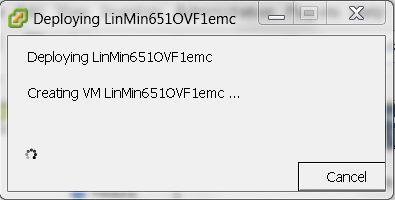
11. Observe the Virtual Machine being created
11a. Suspend your Virtual Machine and take a snapshot (e.g., "Just imported")
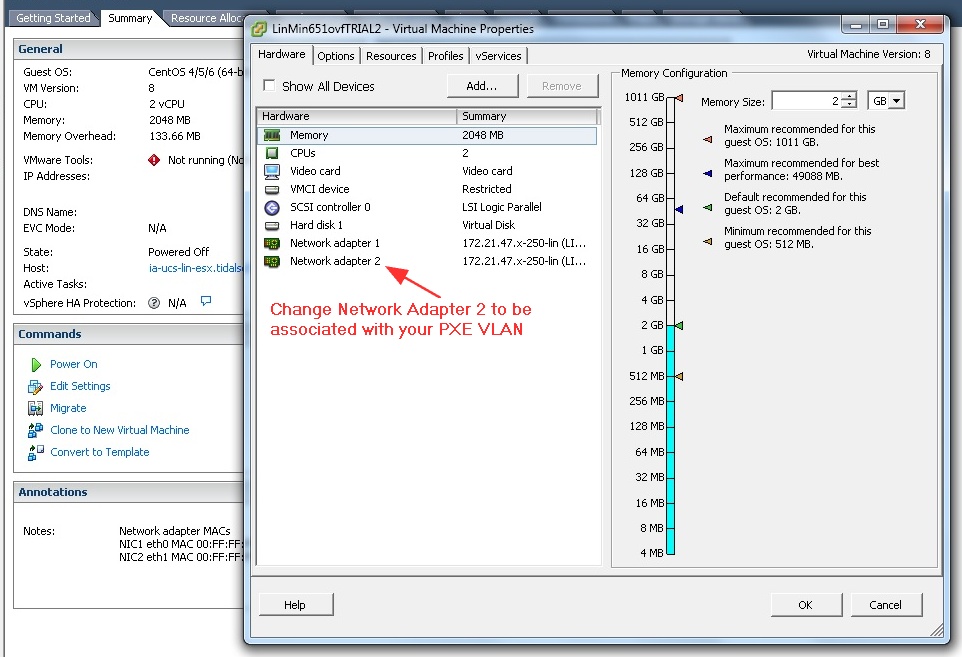
12. After being imported, your Virtual Machine should have 2 Network Adapters.
If it has 2 Network Adapters, make sure that Network Adapter 1 is associated with the administrative network and that Network Adapter 2 is associated with the PXE network:
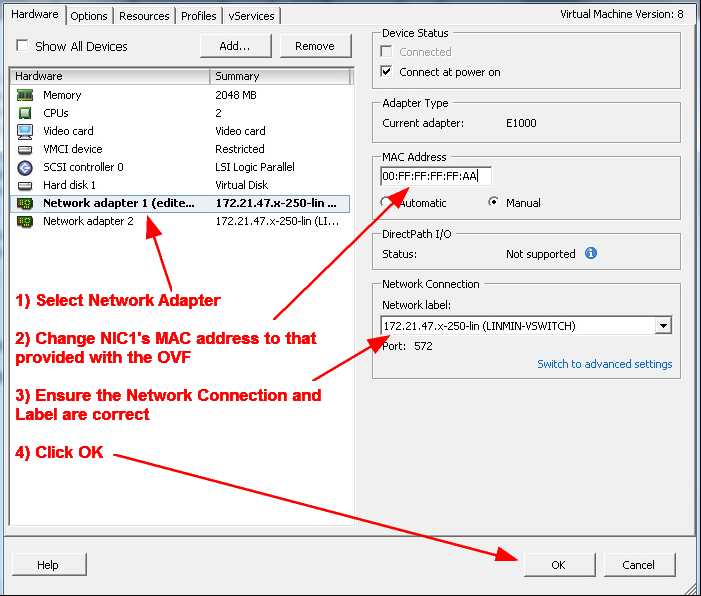
13a. After the Virtual Machine has been created and has 2 Network Adapters, change the MAC address of Network Adapter 1 (see Step 4 for the MAC address to be used)
Keywords: OVF, OVF_Import_NIC_MACs
Recommended: take a screen shot after clicking "OK", e.g. QSG_OVF_013b.jpg
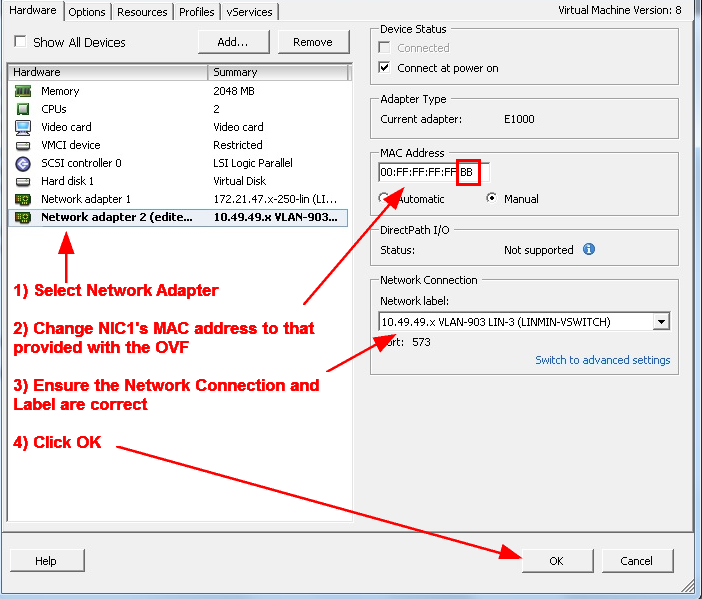
13b. Change the MAC address of Network Adapter 2 (see Step 4 for the MAC address to be used)
Recommended: take a screen shot after clicking "OK", e.g. QSG_OVF_013b.jpg
13c. Suspend your Virtual Machine and take a snapshot (e.g., "Network Adapter MACs changed"). Should you run into network configuration issues later, this will be a convenient restore point to re-network your virtual appliance.
Note: if you wish to add additional devices to meet your unique requirements (e.g., a DVD device), add such devices now.
14. Power on the Virtual Machine and login as Root, using the password "linmin" (all lower case). You will asked to change the password later.
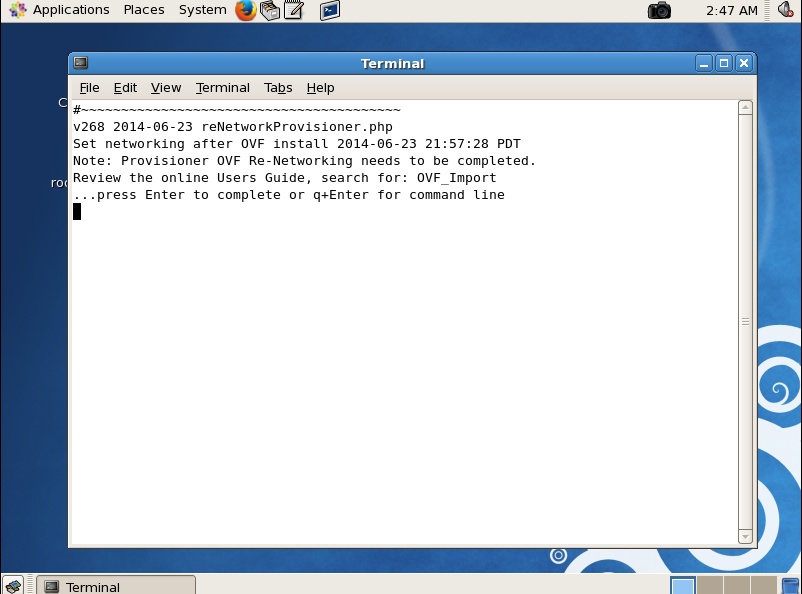
15. Open a Terminal Window: press "Enter" to start reviewing and editing your network configuration files
Keywords: OVF_Import_renetwork
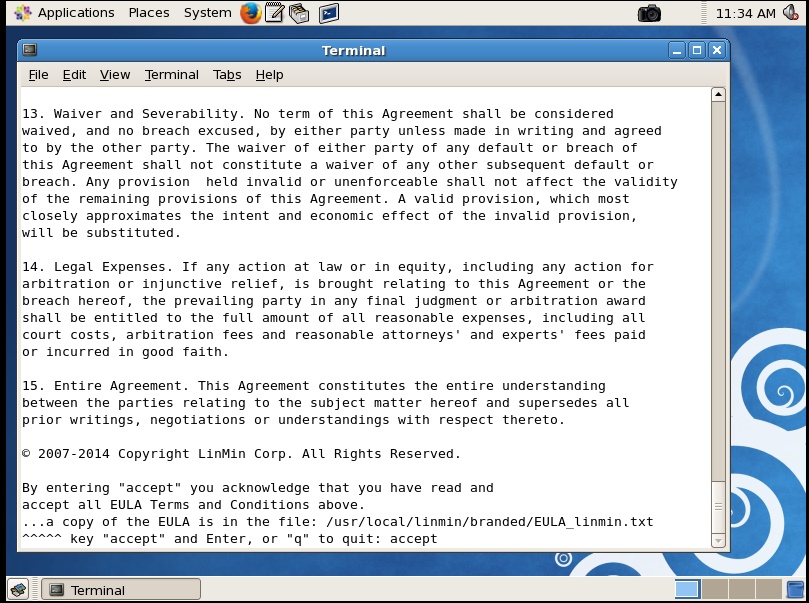
Read and accept the End-User License Agreement, and verify that your system date and time are correct.
16. Read and accept the End User License Agreement (EULA) or quit
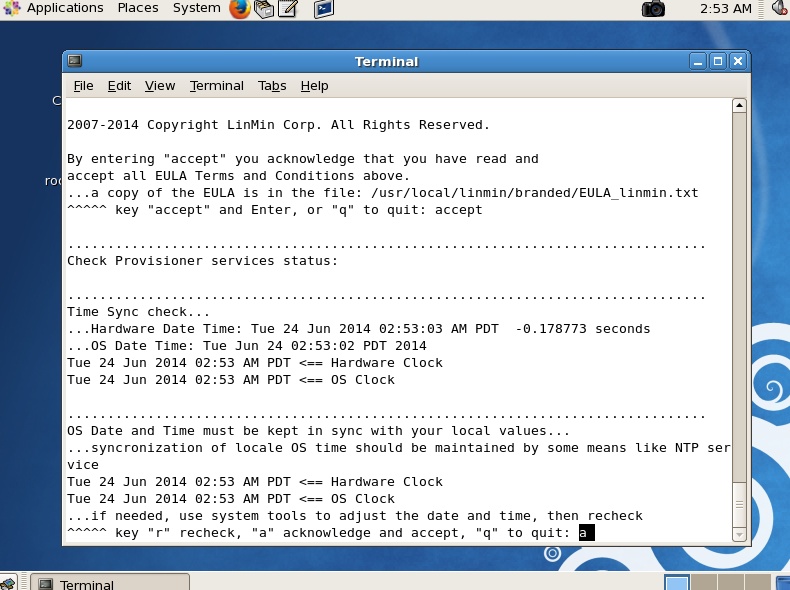
17. Verify that your system Date and Time are correct, then accept them
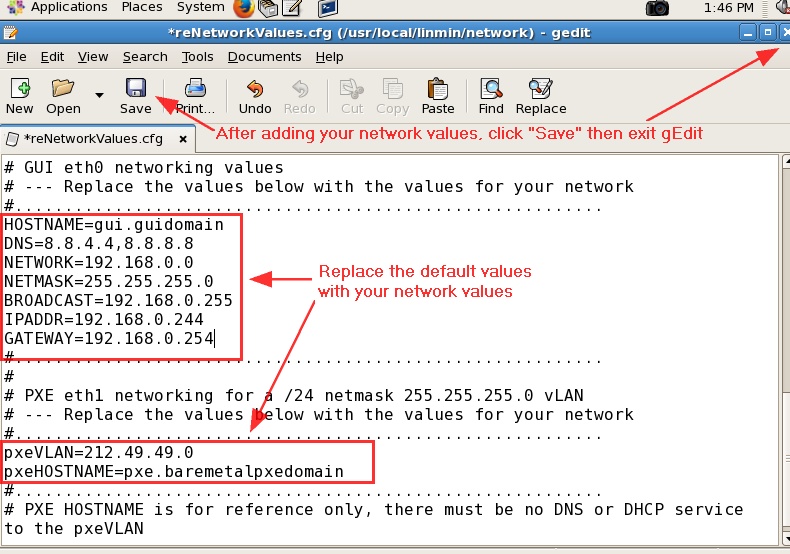
18. You will be presented with the default network values: select "c" to change the default values using the gEdit editor
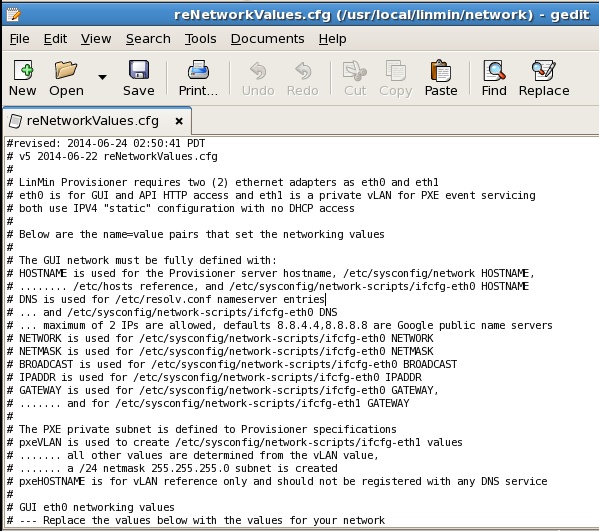
19. The gEdit editor was opened automatically, displaying comments on the network values you are about to change and their change's impact on Linux networking files, as well as the default values you are about to change
20a. In gEdit, replace the default values with your network values, save and close gEdit. Be sure you have valid values before proceeding because changing networking values afterwards requires that you go back to the snapshot in step 13c and proceed forward.
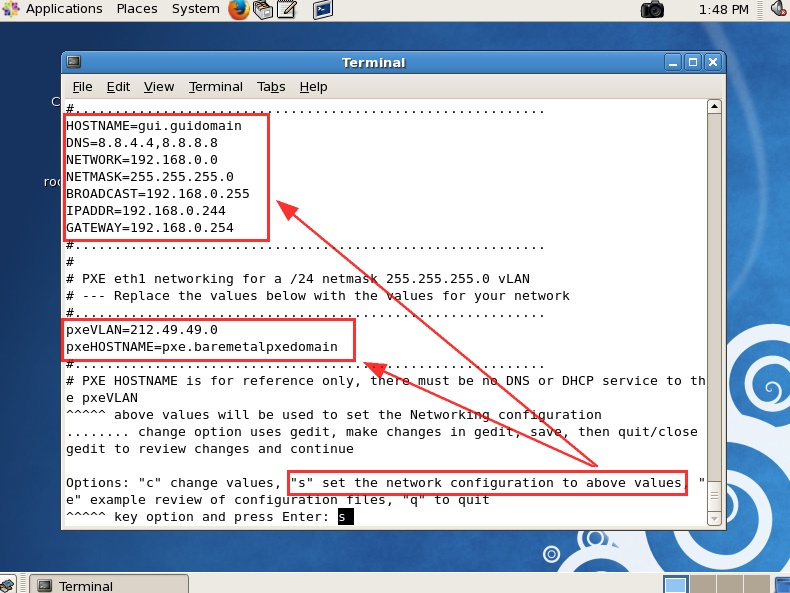
20b. Upon closing gEdit, the terminal window shows the values you modified: if incorrect, key "c" to change the values, and if correct, key "s" to set your new network values
21. Change your root password and confirm
22. Shut down your system when prompted
23. Power on your Virtual Machine and login as root (using the new password you entered previously)
23a. Recommended: take a snapshot of your Virtual Machine (e.g., "Re-networked")
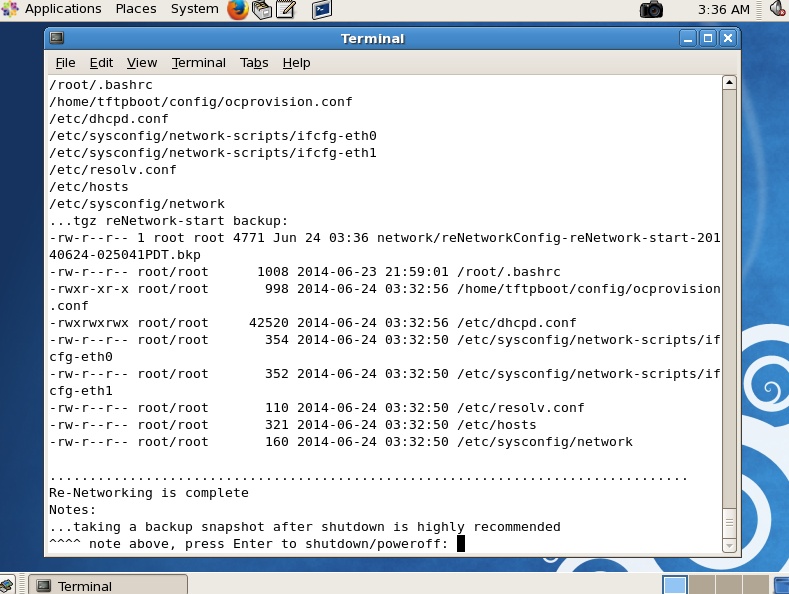
23b. If you wish to review the Linux network files as modified by the Provisioner re-networking script in the previous steps:
[root@gui ~]# cd /usr/local/linmin/
[root@gui linmin]# sh reNetworkProvisioner.sh action=reviewCfg
Modifying network values using this script is not supported at this time: instead, go back to the snapshot of step 13c and proceed forward.
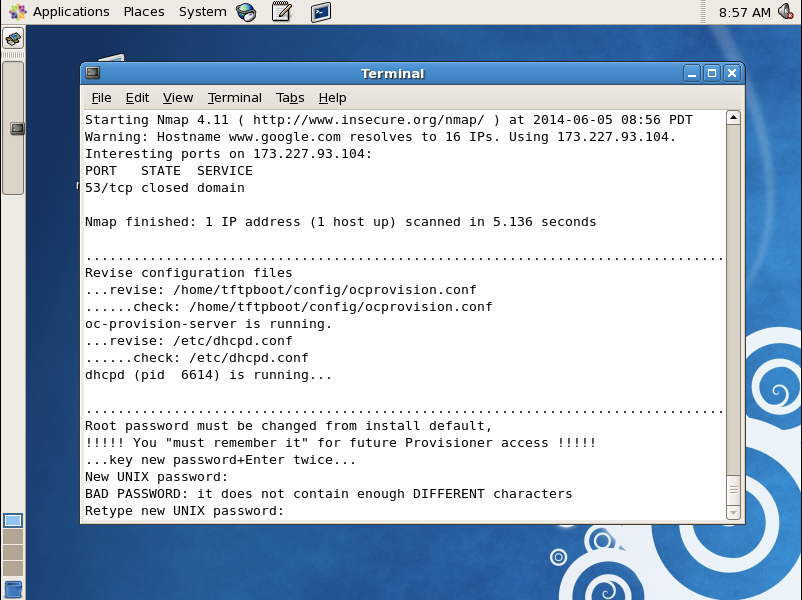
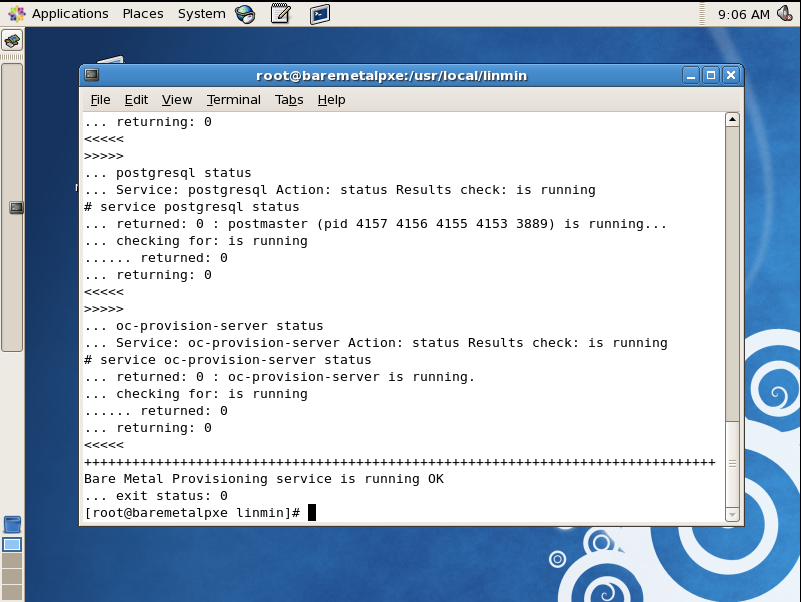
24. Verify that the Provisioner services are running
[root@baremetalpxe]# cd /usr/local/linmin
[root@baremetalpxe linmin] # sh linmin-services.sh status
The screen shot below validates that the services are indeed running.
If the services were not running, restart them:
[root@baremetalpxe linmin] # sh linmin-services.sh restart
If you wish to review and possibly edit your Linux network files
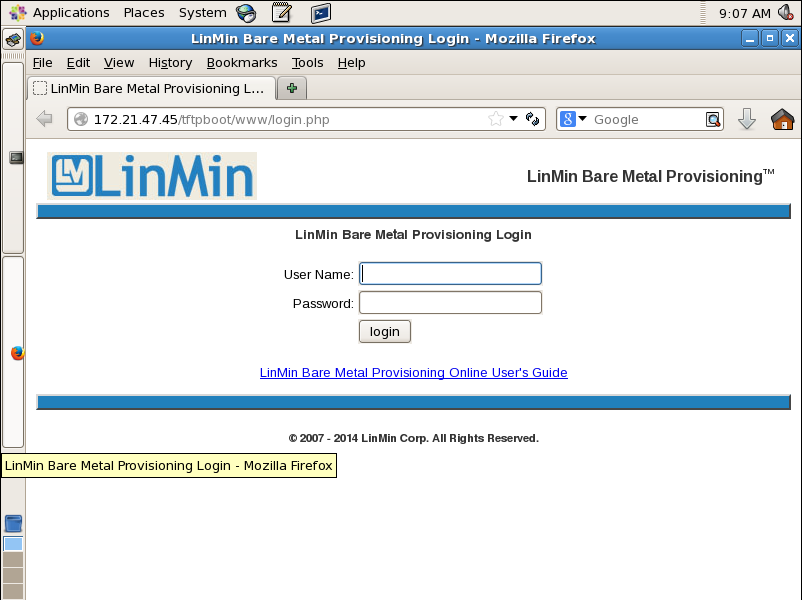
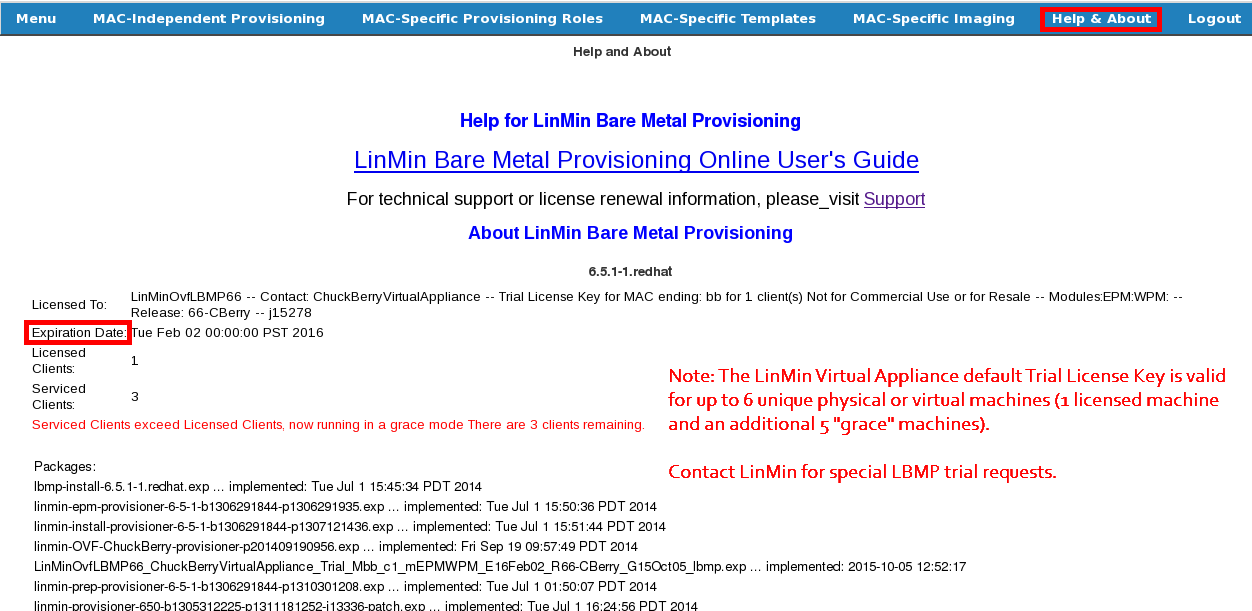
26. Navigate to the Help page and verify that the Provisioner license is installed and is valid (not expired).
27. If the license is invalid or expired, install or upgrade the license key, using the license key file you downloaded or were emailed.
Note: you may wish to change your display resolution at this time.
28. Install the Bill Haley Supplemental Package (optional but recommended if you perform disk imaging, remote hardware capture or provision MS Windows or Windows Server).
29. Shut down your Virtual Machine and take a snapshot (e.g., "Provisioner operational and ready for first use")
If you encounter problems importing and configuring your Virtual Appliance, please visit http://support.linmin.com.
Congratulations! Your Provisioner Virtual Appliance is now ready for use!