Create an ESX and/or ESXi MAC-Independent Provisioning Role
User's Guide feedback on: Cisco Server Provisioner 6.6 User's Guide ("Chuck Berry") - Create an ESX and/or ESXi MAC-Independent Provisioning RoleProvision_ESX_MAC-IndyTutorial: Provision ESXi Hypervisors > Create an ESX MAC-Independent Provisioning Role /Dear User's Guide Staff,
Create an ESX and/or ESXi MAC-Independent Provisioning Role
The required boot sequence for all ESX and ESXi hypervisors is "boot to disk first, then boot to the network". This prevents the accidental deletion of all virtual machines should the host hypervisor be booted to the network accidentally. With this recommended boot sequence, when your disk is empty, you will boot to the network. Your disk must be empty prior to provisioning ESX or ESXi. You may use Live Ubuntu to clear the contents of your drive.
After you have prepared your ISO media, access the MAC-Independent Provisioning dashboard and select the "Add System Role" with the "Windows or Other" option:
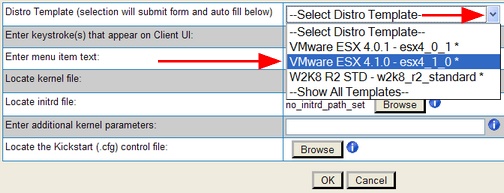
Select the version of ESX you want to provision (remember, if there’s an asterisk next to a drop down selection, it means that the distro media is loaded and ready for use):
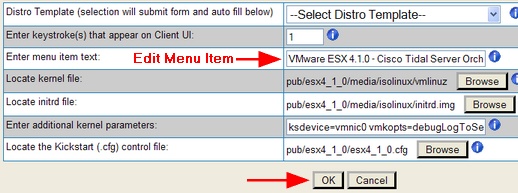
After you have selected the item “VMware ESX 4.1.0”, the form’s fields will be automatically populated. Modify the "Menu Item" to control exactly how the client system's screen will appear:
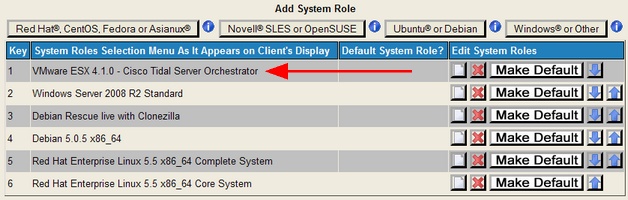
Click "OK" and you will see your newly created MAC-Indy Provisioning Role in the MAC-Independent Roles page:
Note: this screen will not appear on a client system if either a MAC-Specific Provisioning Role or a MAC-Specific Imaging Profile already exists for it.
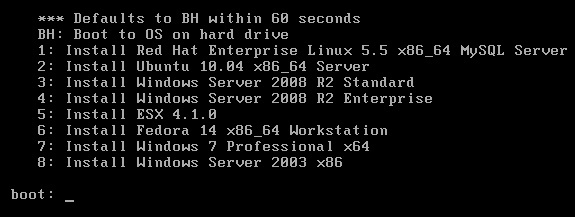
Select "5" in this case to install ESX using the Client system's keyboard. If you have set a "Default", that selection will be installed "unattended" starting in 60 seconds.
Important: MAC Independent provisioning of ESX set as the 'Default' is not supported. MAC Independent provisioning requires console access to the system being provisioned. Provisioning is with dynamic DHCP. ESX generates a new MAC which is unknown to BMP DHCP and is denied DHCP service on the BMP subnet. It is then no longer accessible via any IP. This requires console access to set the networking values.
The required boot sequence for all ESX and ESXi hypervisors is "boot to disk first, then boot to the network". This prevents the accidental deletion of all virtual machines should the host hypervisor be booted to the network accidentally. With this recommended boot sequence, when your disk is empty, you will boot to the network. Your disk must be empty prior to provisioning ESX or ESXi. You may use Live Ubuntu to clear the contents of your drive.
Note: this screen will not appear on a client system if either a MAC-Specific Provisioning Role or a MAC-Specific Imaging Profile already exists for it. MAC-Independent (PXE Menu) provisioning works only with unknown MACs. A MAC is "known" to LBMP if it was used for MAC-Specific Provisioning or Imaging.
If the MAC address is known, the client system will instead display a screen similar to the one below: